Growing grapes from cuttings: the complete field guide
TL;DR
- Grapes root well from dormant hardwood cuttings taken in mid-winter, hitting 60-90% success under good conditions.
- Cut 12-18 inch sections with 2-4 nodes, treat the basal end with IBA rooting hormone, callus them in a warm room for 2-3 weeks, then plant with one node above soil.
- Certified wood keeps viruses out that quietly cut yields for decades.
Why propagate grapes from cuttings instead of buying vines?
Buying certified vines is the safe, fast path. But they're expensive, the variety you want may be backordered two years, and you may already have the exact mother vine you need standing in your own block. Cuttings let you multiply a clone that's performing, match a rootstock-scion combination that already works on your site, or hold costs down when you're planting hundreds of fill-in vines.
The money is real. Bare-root certified vines in the U.S. typically cost $5 to $10 each at nursery quantity, higher for premium clones, and prices climbed through recent supply crunches [1]. Say you need 500 fill-in vines for a replant. That's $2,500 to $5,000 in plant material alone, before freight, before the season you lose waiting on back-orders. One healthy mother vine gives you 20 to 40 cuttings a dormant season. The math shifts fast.
The catch is disease. Grapes carry viruses through vegetative propagation, leafroll being the worst, and they carry them silently. A vine can look flawless and still hand Grapevine leafroll-associated virus (GLRaV) to every cutting you pull off it. UC Davis Foundation Plant Services has documented yield losses of 20-40% and sugar reductions of 1-2 Brix in infected vines against clean material [2]. That's not a rounding error.
So before you propagate anything, you need one of two things: a certified clean source confirmed by PCR testing, or a knowing acceptance of the risk with material kept strictly inside your already-infected block.
For a new vineyard, always buy certified. For fill-ins in an existing block, cuttings from tested mother vines are a legitimate, cheap option.
What's the difference between hardwood and softwood grape cuttings?
These are two different operations with different timing, different gear, and different success rates. Pick the wrong one for your setup and you'll bin a lot of dead wood.
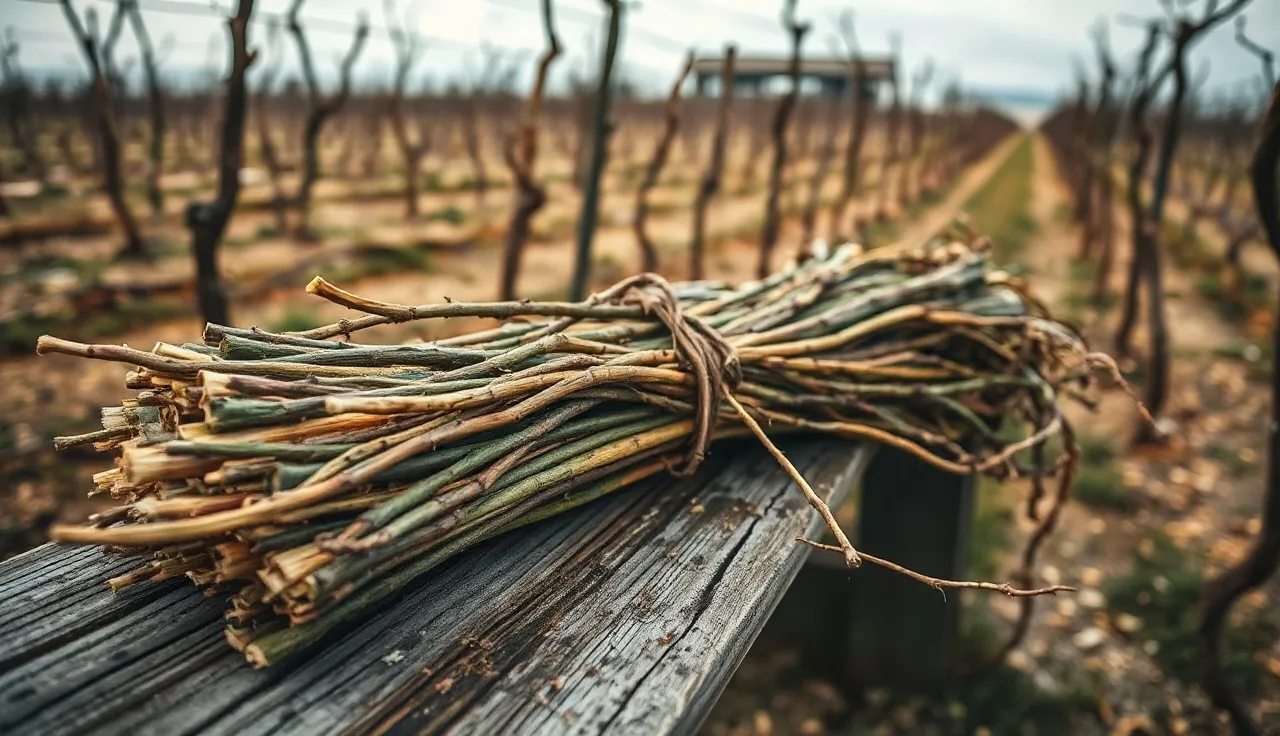
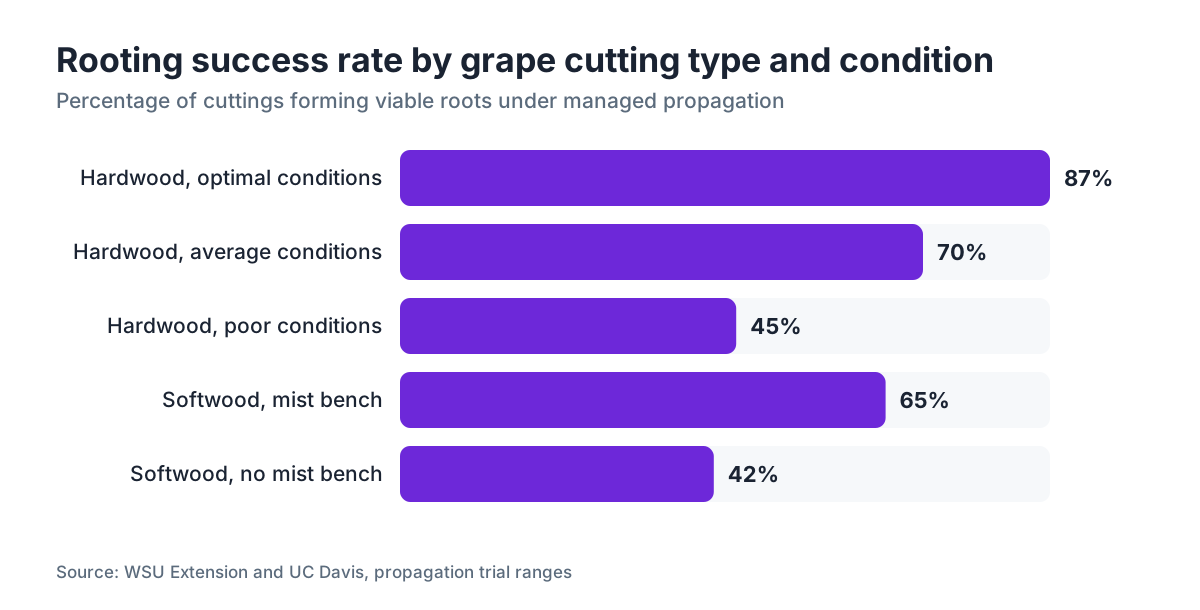
Hardwood cuttings come from fully dormant, lignified canes taken after leaf drop, from fall through late winter, usually December through February in most Northern Hemisphere wine regions. The wood is firm, brown, and pencil-thick (about 6-10 mm). This is the standard commercial method. It handles storage, shipping, and rough handling, and it roots at 60-90% under good conditions [3]. Almost every commercial grape propagation operation runs on it.
Softwood or green cuttings come from actively growing shoot tips in spring and early summer. They root faster, sometimes in 2-3 weeks, but they're fragile. They need a mist bench or a humidity tent so they don't wilt before roots form. Skip that infrastructure and your success rate falls off a cliff. A home grower with a simple cold frame will find hardwood far more forgiving.
There's a middle path too: semi-hardwood cuttings taken in late summer, once current-season wood has started to firm up. Grapes use this less than many other woody plants do, but it works if you missed the dormant window and need material.
Hardwood is the practical choice for most vineyard managers. The rest of this article is about hardwood, with notes where softwood behaves differently.
| Type | Timing | Node count | Success rate | Infrastructure needed |
|---|---|---|---|---|
| Hardwood | Dec-Feb (dormant) | 2-4 nodes | 60-90% | Callusing box or warm room |
| Softwood | May-Jun (active growth) | 2-3 nodes (tip) | 40-70% | Mist bench or humidity tent |
| Semi-hardwood | Aug-Sep | 2-3 nodes | 50-75% | Shaded bench, humidity |
Success rate ranges come from WSU and UC Davis extension guidance [3][4].
When exactly should you take hardwood grape cuttings?
The sweet spot is after the vine is fully dormant but before bud swell in spring. In practice that runs from the first hard frost through late February or early March, depending on your climate zone.
Take cuttings when dormancy is deepest, usually January across California, Oregon, and Washington wine country. Carbohydrate reserves stored in the cane peak then, and those reserves are what the cutting lives on while it forms callus and root primordia before any leaf opens.
Pruning season is your opening. Many growers take cuttings while they're doing dormant pruning, picking the best one-year-old cane wood as they move through the block. That costs almost no extra time. Canes you'd otherwise chip or burn go into the propagation bin instead.
Don't take cuttings right after a hard freeze if the wood hasn't had a day or two to settle. Freshly frozen tissue can hold ice-crystal damage that won't show until rooting fails weeks later. Let the canes warm indoors for a day before you cut.
Warm climates complicate this. In parts of the San Joaquin Valley or coastal Southern California, true dormancy is short. UC Davis extension points growers toward the 45-60 day window after cumulative chilling hours are met and before daytime temps sit consistently above 60°F (15°C) [2].
How do you make a grape cutting correctly? Size, node count, and cuts explained
The mechanics are simple, and they matter. A bad cut on either end sets up failure before the cutting ever touches soil.
Length: 12 to 18 inches (30 to 45 cm) is the standard commercial range. Longer cuttings hold more carbohydrate reserve and tend to root better in the field. Shorter ones (6-8 inches, sometimes called short-cuttings) go into mist-bench tray systems. For field planting of hardwood cuttings across most of the western U.S., 12-16 inches is the sweet spot [3].
Node count: 2-4 nodes per cutting. You want at least one node buried (that's where root primordia start) and one above the soil line. Three nodes gives you a buffer if one fails.
The basal cut (bottom, goes into the soil) belongs just below a node, about 1/4 inch (6 mm) below. Nodes hold the highest concentration of meristematic tissue, so cutting there gives you the most rooting potential.
The distal cut (top, faces up) goes about 1 inch above the top node at a slight angle so water sheds off the bud. The angle is practical, not magic. It keeps the stub from sitting wet and rotting back into the top node.
Use clean, sharp bypass pruners or a grafting knife. Crushed or torn wood at the cut face heals poorly and invites fungi in. Wipe your blades with 70% isopropyl or a 10% bleach solution between mother vines if you have any disease concern. That matters most for eutypa and Botryosphaeria canker diseases, which ride from vine to vine on pruning tools [4].
Cane diameter should be roughly pencil-thick, 6-10 mm. Skip skinny laterals and fat water shoots. The best wood comes from well-positioned, moderate-vigor canes that carried a full crop last season, because those built solid starch reserves.
Should you use rooting hormone on grape cuttings?
Yes, for most situations. Grapes are not the easiest woody plant to root, and the data consistently shows IBA (indole-3-butyric acid) improves both rooting percentage and root density.
IBA is the standard active ingredient in commercial rooting compounds (Dip 'N Grow, Hormex, and the like) and in the talc powders on garden-center shelves. For hardwood grape cuttings, growers commonly use 2,000-3,000 ppm IBA in liquid or 3,000-8,000 ppm in talc. WSU extension puts the recommended range at 3,000-5,000 ppm IBA for grape hardwood cuttings in their propagation materials [3].
Application is quick. Dip the basal 1-2 inches into liquid IBA for 5 seconds, or tap into talc and shake off the excess. Don't soak hardwood cuttings in high-concentration IBA for more than a few seconds. Long contact at high strength inhibits rooting instead of helping it. Some growers run a dilute 200-500 ppm soak for 12-24 hours on hardwood cuttings and get good results; WSU extension describes that extended-soak approach as effective [3].
IBA is a plant growth regulator, so its use generally isn't restricted the way an insecticide is. Still, check your state's pesticide registration database if you're using a commercial formulation. Pulling up your state department of agriculture's site takes five minutes.
Honest caveat: some skilled propagators skip hormone entirely on Vitis vinifera and still hit 70-80% with clean cuttings and ideal callusing. The hormone helps, but it's not the whole game. Moisture, temperature, and the quality of the mother-vine wood matter more.
What is callusing and why does it matter for rooting success?
Callus is the white, spongy mass of undifferentiated parenchyma tissue that forms at the cut basal surface before true roots emerge. It isn't roots, but it usually comes right before them, and a strong callus is one of the best signs a cutting is on track.
Here's the standard approach. Bundle your cuttings in groups of 20-50, all basal ends aligned, and store them basal-end-up in a box of lightly moist peat, sawdust, or perlite. Put the box somewhere warm, 65-75°F (18-24°C). Keep the top (distal) ends cool, or leave them out in ambient air. You're building a temperature split: warm bottoms drive callus and root initiation while cool tops hold back bud break, so the plant pours energy into roots before it tries to open leaves [3][4].
Two to three weeks of callusing at those temperatures is typical before planting. Pull a cutting, and when you see a firm white collar of callus around the basal cut face, it's ready. You may even spot nubs of root primordia starting to push.
Skip callusing and you're planting dormant wood, hoping soil temperature climbs fast enough that roots form before buds open and demand more water than a rootless cutting can supply. In spring field conditions that race is winnable, but the margin is thin. A 2-3 week callusing period indoors improves outcomes in most extension trials [3].
Small batch? A five-gallon bucket with a lid, some moist peat, and a warm corner of the shop does the job. You don't need a fancy callusing box.
How do you plant grape cuttings in the field or nursery bed?
Medium and drainage matter more than most beginners expect. Grapes root best in a well-aerated, free-draining substrate. A heavy clay nursery bed stays too wet and roots suffocate or rot. Work a nursery row in sandy loam, or add compost and coarse sand to open up drainage before you plant.
Depth: bury the cutting so only one node sits above the soil surface. For a 14-inch cutting, that's roughly 10-12 inches in the ground. It feels counterintuitive, but deep planting gives you more rooting nodes in soil, more protection from heat and drying, and a head start on a deep root system. Cornell University's viticulture program recommends at least 2-3 nodes below soil in its propagation guidance [5].
Spacing in a nursery bed: 6-8 inches apart in-row, rows about 3 feet apart so you can cultivate. At that spacing, 100 cuttings fit in roughly a 50-square-foot bed.
Firm the soil around the cutting carefully. Air pockets at the base are a common cause of drying failure. Water in gently.
Moisture over the first 4-6 weeks is the most hands-on part of the whole job. Soil should stay consistently moist, never waterlogged. Cuttings have no roots to pull water, so they depend entirely on soil contact for the little moisture they need while callus forms. A light organic mulch (straw, wood chips) over the bed holds moisture and softens soil-temperature swings.
Bud break will happen before rooting is done. Don't panic. Some shoot growth on a rootless cutting is normal; the vine is burning stored carbohydrate. Keep the soil moist and let it run. Roots usually follow within 2-4 weeks of bud break under good conditions.
What rooting rates should you realistically expect?
This is one of those areas where online forums hand you false confidence. People post their best results. The honest figure from controlled trials is that 60-90% of well-prepared hardwood cuttings from clean mother vines root under good conditions, and that range is wide enough to swallow a lot of failure [3].
Factors that push you toward 85-90%: fresh, pencil-thick canes from the current season, collection timed to mid-dormancy, IBA treatment, warm callusing (70°F) for 3 weeks, well-drained media, and steady moisture.
Factors that drag you toward 40-50%: canes too thin or too old, wood taken too early before full dormancy or too late once buds have swelled, skipped callusing, heavy clay nursery soil, ragged watering, virus-infected mother vines.
Nobody has great aggregated data across diverse vineyard conditions on this. The closest published figures come from WSU extension propagation trials and UC Davis viticultural work, which bracket that 60-90% range for hardwood cuttings under managed conditions [2][3]. Softwood in mist-bench trials often shows higher peak rates when everything's dialed in, but the failure when humidity drops is far steeper.
Plan for 60-70% take if you're being conservative and pricing out how many to start. Need 200 plants? Start 300 cuttings.
How do you source clean, disease-free mother vines for cuttings?
This is where the whole operation goes right or wrong, and it's where most small operators underestimate the risk.
Grapevine leafroll complex (GLRaV) is the disease that keeps plant pathologists up at night. It's graft- and cutting-transmissible, often symptomless in young vines, and once it's in a block it spreads by mealybugs and other vectors. A 2012 study in the American Journal of Enology and Viticulture found leafroll infection cut berry sugar by up to 2.4 Brix and delayed maturity 1-3 weeks in Cabernet Sauvignon [6]. Those are season-changing numbers.
In California, the California Department of Food and Agriculture (CDFA) runs the Foundation Plant Services (FPS) program at UC Davis, which maintains and distributes virus-tested, heat-treated grapevine foundation material [2]. Certified nurseries source from it. Buy certified vines and you're buying plants traced back to FPS-indexed clones.
Taking cuttings from your own block? The honest protocol is to have the mother vines PCR-tested by a certified lab before collection. CDFA-approved labs run leafroll, fanleaf, and other virus panels. Testing usually costs $40-80 per sample depending on the panel. That's the price of knowing.
Plenty of growers propagate from untested vines internally and accept the risk. That's a real choice. But propagating from untested material into a new block, or selling cuttings to other growers, is how regional disease pressure spreads. It can also be illegal depending on your state's plant quarantine rules.
If you're tracking mother-vine selection, propagation lot numbers, and testing records, keeping organized logs from day one pays off the moment you face a nursery audit or a disease trace-back. A platform like VitiScribe can store those field records next to your spray logs and harvest data, so propagation documentation lives with everything else.
What regulations apply to grapevine propagation and plant movement?
Propagate for your own use, within your own property, and in most states you're operating within your rights with almost no regulatory burden. Move cuttings across state lines or sell propagation material and the picture changes fast.
Interstate movement of grapevines (cuttings included) is regulated by USDA APHIS plant health programs and by individual state departments of agriculture. Phylloxera, Pierce's disease (Xylella fastidiosa), and various viruses are all regulated pests or pathogens that states guard against through import permits and inspection requirements [7]. California, for one, requires a phytosanitary certificate for grapevines entering the state.
Selling cuttings or rooted plants to other growers? You'll generally need a state nursery license and may need to meet a state certified nursery program's rules. Requirements vary by state. Check with your state department of agriculture's plant industry or nursery division before you sell a single cutting.
Worker protection is easy to forget on a small propagation setup. When you treat propagation beds or nursery areas with pesticides, the EPA Worker Protection Standard (WPS) applies if agricultural workers enter treated areas. The 2015 revised WPS requires training for workers and handlers, central posting of pesticide application information, and the personal protective equipment listed on the product label [8]. Even running your own small operation, don't skip WPS when you're spraying fungicide on nursery beds.
State certification programs like CDFA's Nursery Program or New York's certified nursery program [9][10] exist so buyers can trust that propagation material is clean and properly labeled. Scaling up to sell cuttings commercially? Getting certified is the professional path.
What are the most common reasons grape cuttings fail to root?
Failure is the default if you cut corners on any of four things: wood quality, timing, moisture, and temperature. Here's where the losses actually come from.
Desiccation is the single biggest killer. The cutting has no roots and survives on the water stored in its wood. Let the soil or medium dry out, or store the cutting too long in drying conditions, and the cambium desiccates and root initiation fails. When in doubt, mist your cuttings and wrap bundles in moist burlap through any storage.
Bud break before rooting, the race problem, takes a close second. Warm temperatures at planting open buds fast, and the leafing shoot pulls water and carbohydrate that should be feeding root formation. This is exactly why callusing warm at the base and cold at the top works: roots get going before the top bud has any idea spring arrived.
Fungal rots, mainly Botrytis and Fusarium, move through callusing bundles when humidity runs too high and air circulation too low. A light dusting of a registered fungicide before bundling, or switching to perlite instead of wet peat as callusing medium, cuts that risk [4].
Virus-infected wood sometimes roots poorly, though the real loss there is yield over the vine's lifetime, not the propagation itself.
Last one: poor cane selection. Thin lateral shoots and mature trunk wood just don't root as reliably as moderate-vigor one-year-old cane from a productive vine. The best rooting wood looks like what you'd want to leave at pruning time: straight, brown, 6-10 mm, with tight internodes and clean, well-defined nodes.
How long until cuttings produce a harvest?
Patience is the price of propagation. From cutting to first commercial harvest, plan on three years minimum in most regions, with four to five years more realistic for a vine reaching its productive potential.
Year 1: cuttings root, put out a little shoot growth, and go into winter as a rooted stick. You're building root mass, not shoot mass. No fruit.
Year 2: the vine sets a canopy framework. You might see a few clusters. Most training systems call for stripping all fruit in Year 2 so the vine can push energy into wood and roots. Hard rule to follow. Worth following.
Year 3: first partial commercial harvest becomes possible. Yields run low, maybe 10-30% of mature capacity depending on variety and vigor.
Year 4-5: closing on full production. Some vigorous varieties in warm climates get there faster; slow-establishing varieties on difficult sites or own-rooted plantings take longer.
Bench grafting onto rootstock or field budding follows a similar timeline, though an established rootstock root system can speed things along. Grafting own-rooted cuttings is a separate skill set, and UC Davis Foundation Plant Services publishes detailed guidance on the process [2].
For a small vineyard doing fill-in planting with cuttings from tested mother vines in the same block, this timeline is manageable. For a new vineyard, the three-to-four-year wait is a cash flow reality to plan around.
Can you propagate grapes from cuttings on your own rootstock?
Yes, and this is where propagation gets genuinely interesting for phylloxera-affected regions. Rootstock cuttings (Riparia, Rupestris, 101-14, SO4, 3309C, and others) root from hardwood using the same basic method as vinifera, and many rootstock varieties root more readily and at higher percentages than vinifera does.
Have a rootstock mother block? You can produce your own rooted rootstock liners, then graft your scion variety onto them by dormant bench grafting in late winter. That's how large commercial nurseries work. It's a two-year process from rootstock cutting to a grafted, field-ready vine, but the per-vine cost in plant material can be a fraction of buying grafted vines [1].
Bench grafting (omega grafting with a machine, or hand cleft grafting) is beyond this article, but WSU and Cornell both publish detailed guides on small-scale bench grafting for vineyard establishment [3][5].
In phylloxera-free areas (parts of Chile, Washington's high desert, certain sandy soils), growing own-rooted vinifera from cuttings is fully viable and drops the cost and complexity of grafting. Most of Southern Oregon's older Pinot blocks are own-rooted Pommard and Wadenswil clones that have held 40-plus years in the ground without phylloxera trouble, largely because of soil type.
Know your phylloxera risk before you decide to skip rootstock. Across most of California's fine wine country, planting own-rooted vinifera is asking for a replanting bill in 10-20 years.
For vineyard managers tracking cuttings across multiple blocks, rootstock varieties, and propagation years, clean records from day one matter. VitiScribe lets you log block-level propagation alongside your spray and harvest records, so nothing gets reconstructed from memory at audit time. See how propagation fits the full season on our vineyard operations pages.
Frequently asked questions
How many cuttings can you get from one grapevine?
A mature, well-trellised vinifera vine pruned to a spur or cane system typically yields 20-40 cuttings per dormant season, depending on vine size and training system. High-vigor vines on fertile soils or long-cane trained systems yield more. Rootstock mother vines managed specifically for cutting production, with longer retained canes, can yield 50 or more per vine annually.
Do you need a rooting hormone to propagate grapes from cuttings?
No, but it helps. Grapes can root without IBA rooting hormone, and experienced propagators sometimes skip it on vigorous rootstock varieties. For Vitis vinifera, IBA at 3,000-5,000 ppm reliably improves both rooting percentage and root density against untreated controls in WSU extension trials. If you're starting a large batch or a difficult-to-root variety, the small cost is worth it.
What's the best time of year to take grape cuttings?
Mid-dormancy, typically January through mid-February in most Northern Hemisphere wine regions. That timing captures the highest carbohydrate reserves in the wood, after full dormancy is set but well before bud swell. In California's Central Valley, December collections also work. Wait until March and you risk catching cuttings once buds are already swelling, which sharply reduces success.
Can you root grape cuttings in water?
Yes, short-term, and some home propagators do it successfully. Cuttings placed basal-end-down in a jar of room-temperature water often show callus and root nubs in 3-4 weeks. The problem is that water-adapted roots are often brittle and transition poorly to soil. For production-scale propagation or any planting that needs a strong root system, soil or perlite media gives better long-term results.
How do you store grape cuttings before planting?
Bundle cuttings with all basal ends aligned, wrap in moist burlap or newspaper, and store in a plastic bag in a refrigerator or cold room at 33-40°F (1-4°C). Cuttings hold well for 4-6 weeks that way. For longer storage up to 3-4 months, pack bundles in barely moist peat or sawdust in a sealed container in cold storage. Check every few weeks for mold.
Do grape cuttings need sunlight to root?
No. During callusing and rooting, cuttings need warmth at the base and moisture, not light. Roots form in the dark, in the soil. Once shoots have leafed out and the vine is establishing, full sun is ideal. Move freshly rooted liners from shade to full sun too fast and you'll scorch new leaves; transition them over 7-10 days.
What diseases can spread through grape cuttings?
Grapevine leafroll virus complex (GLRaV-1 through GLRaV-13), Grapevine fanleaf virus, Red Blotch virus, and crown gall (Agrobacterium vitis) all move through vegetative propagation. Leafroll is the biggest yield threat, documented at 20-40% yield reduction in UC Davis research. PCR testing of mother vines by a certified lab before taking cuttings is the only reliable way to confirm clean status.
What's the difference between cuttings and layering for grape propagation?
Layering bends a live, attached cane into the soil while it's still connected to the mother vine, letting it root before you sever it. Success rates run very high since the shoot never loses water or nutrients during rooting. The downside is it works vine-by-vine and can't scale like cuttings. Layering fills single gaps in a row; cuttings produce large numbers of new plants.
Can you propagate grapes from leaf cuttings or root pieces?
Grape leaves don't root. Root pieces can produce new plants (this is how phylloxera spreads, root fragments on farm equipment carry viable tissue), but root cutting as an intentional method isn't practical for commercial viticulture. Cane cuttings, hardwood or softwood, are the standard. Some research programs also use meristem tissue culture for rapid multiplication and virus-elimination of foundation material.
How many nodes should a grape cutting have?
Two to four nodes is the standard recommendation. Two is the practical minimum: one buried node for rooting and one above soil for shoot development. Three is more common for field-planted cuttings because it gives redundancy if one node fails. Four-node cuttings on long hardwood sections are used for deep planting in some arid regions where deeper soil moisture is critical for establishment.
Do I need a nursery license to propagate and sell grape cuttings?
In most U.S. states, yes. Selling grapevine propagation material (cuttings or rooted plants) generally requires a state nursery dealer or grower license and, depending on the state, enrollment in a certified plant program. Propagating for your own on-farm use typically doesn't require a license, but moving material across state lines requires USDA APHIS compliance and may require phytosanitary certification. Check with your state department of agriculture before selling.
What soil or growing medium works best for rooting grape cuttings?
Free-draining, aerated media is the key requirement. Coarse perlite alone or 50/50 perlite and peat is popular for nursery-tray propagation. For field nursery beds, sandy loam or loam amended with coarse sand performs well. Heavy clay holds too much water and starves the rooting zone of oxygen. pH in the 6.0-7.0 range is fine. Avoid high-fertility media during rooting; root development is triggered partly by the cutting's need to seek water and nutrients.
How long does it take grape cuttings to root?
Under optimal conditions with proper callusing at 70°F, root primordia begin forming within 2-3 weeks at the callus face. Visible roots in nursery media appear 4-8 weeks after planting. Full rooting to transplant-ready status takes 8-12 weeks in a nursery bed or rooting tray. Timing varies with variety, temperature, and media. Rootstock varieties like 5BB or 101-14 often root faster and more fully than many vinifera.
Can you grow grapes from cuttings in pots or containers?
Yes, and it's a good approach for callusing and early rooting before you transplant to the field. Use a 4-6 inch deep cell or one-gallon container with well-draining mix, keep it in a warm spot (65-72°F), and hold consistent moisture. Once roots are well-formed and the shoot has 4-6 inches of growth, the rooted cutting can go into a larger container or straight to a field site after hardening off.
Sources
- USDA NASS, Grape Prices and Production data: Certified bare-root grapevines in U.S. production typically cost $5 to $10 each at nursery quantity, with premium clones running higher
- UC Davis Foundation Plant Services, Grapevine Registration and Certification Program: CDFA FPS maintains virus-tested, heat-treated grapevine foundation material; leafroll infection documented at yield losses of 20-40% and 1-2 Brix sugar reduction
- Washington State University Extension, Grapevine Propagation publication: Hardwood cuttings achieve 60-90% rooting success under good conditions; IBA recommended at 3,000-5,000 ppm; 12-16 inch cuttings with warm callusing described
- University of California Agriculture and Natural Resources (UC ANR), grapevine pruning and canker disease guidance: Eutypa and Botryosphaeria canker pathogens can move on pruning tools; semi-hardwood callusing protocol and fungal rot management described
- Cornell University College of Agriculture and Life Sciences, grapevine propagation and grafting resources: Cornell recommends 2-3 nodes below soil surface for hardwood grape cuttings; bench grafting for small-scale vineyard establishment described
- American Journal of Enology and Viticulture, Leafroll virus yield impact study: Leafroll infection reduced berry sugar content by up to 2.4 Brix and delayed maturity 1-3 weeks in Cabernet Sauvignon (2012 published study)
- EPA Worker Protection Standard (40 CFR Part 170), 2015 revised rule: WPS requires worker training, central posting of pesticide application information, and PPE as specified on product labels for agricultural workers entering treated areas
- California Department of Food and Agriculture, Nursery Program: CDFA Nursery Program certifies propagation material and requires nursery licenses for selling grapevine material; phytosanitary certificates required for vines entering California
- New York State Department of Agriculture and Markets, Nursery Dealer and Grower licensing: New York requires nursery dealer or grower registration for selling grapevine propagation material; certified nursery program exists for clean planting stock
Last updated 2026-07-09