How to perform a vineyard soil sample test (step-by-step guide)
TL;DR
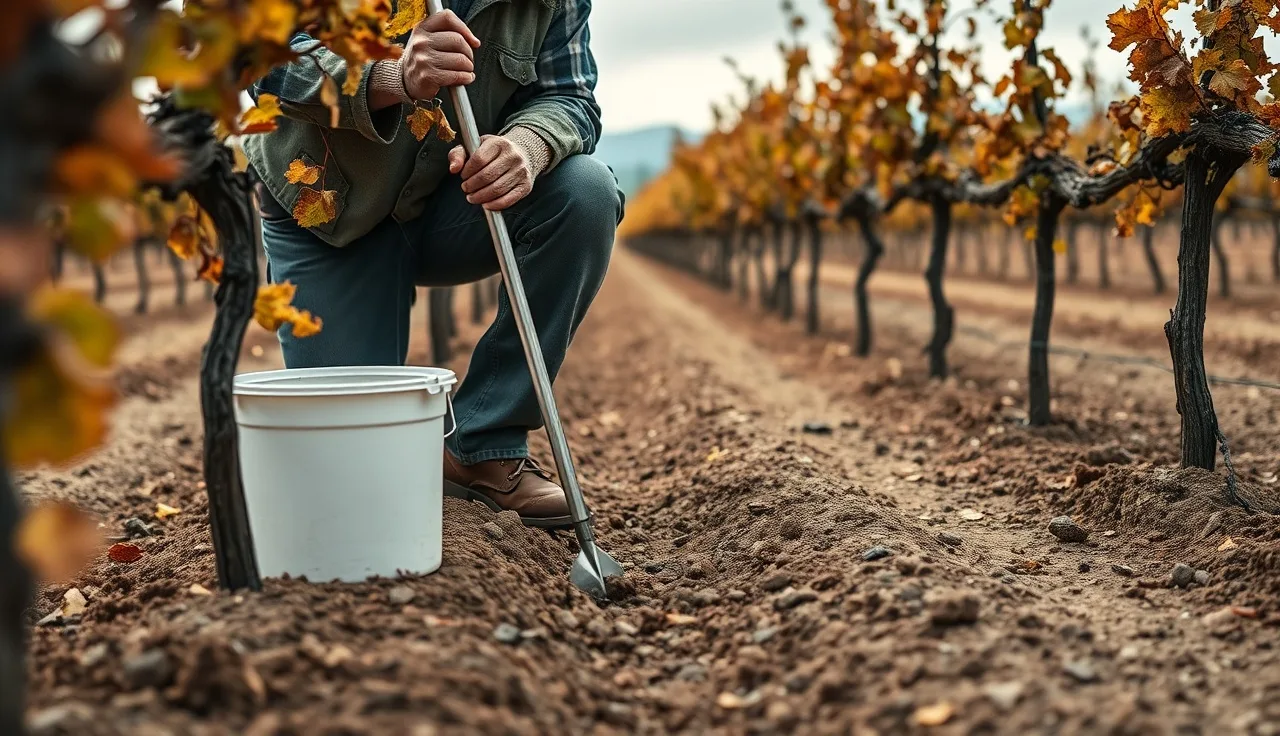
- Pull 15-20 subsamples per 5-acre management zone at 0-12 inch depth (add a 12-24 inch pull if salinity or rootstock depth matters), composite them in a clean plastic bucket, air-dry or refrigerate overnight, and ship to a certified lab within 24-48 hours.
- Budget $30-$80 per composite sample.
- Test every 2-3 years, annually if you're correcting pH or managing a young block.
Why does vineyard soil sampling matter, and how often should you do it?
Grapevines are perennial. A pH problem you ignore at planting costs you three to five years of corrective liming before the vine catches up. That's the real reason soil testing isn't optional. It's the only way to make lime, gypsum, potassium, and phosphorus decisions anchored in data instead of habit.
UC Cooperative Extension recommends sampling every 2-3 years in established vineyards, and annually in the first few years of a new planting or whenever you're actively correcting a deficiency [1]. WSU Extension adds that young or recently replanted blocks warrant annual sampling because pH and nutrient levels move faster when soil is being disturbed and amended [2].
Don't confuse soil testing with petiole testing. They answer different questions. Soil tests tell you what's in the ground and available for roots to find. Petiole tests tell you what the vine actually took up. You need both for a full picture, but soil tests come first. They set the amendment strategy before the season starts.
One field reality: if your vineyard has multiple soil types mapped across the property (common on California's central coast or in the Pacific Northwest), a single composite sample for the whole block is nearly worthless. Zone your sampling to match your soil map.
What equipment do you need before you start sampling?
The gear is cheap and you probably already own most of it. Here's what you actually need.
- A soil probe or soil auger. A 3/4-inch to 1-inch diameter stainless steel or chrome-plated probe is standard. Skip galvanized probes for zinc-sensitive analyses; the coating can contaminate the sample [3].
- A clean 5-gallon plastic bucket. No metal buckets. They skew micronutrient readings.
- A clean plastic bag or the sample bag from your lab. Most labs send these free with a submission kit.
- Permanent marker and waterproof labels. Write the sample ID on the bag before you put soil in it, not after.
- A GPS device or your phone with a mapping app. Record the sample location. If you're logging these into a record-keeping system like VitiScribe, you can attach coordinates to each zone and pull historical comparisons without hunting through paper files.
- Nitrile gloves. The EPA Worker Protection Standard (WPS) and general pesticide label language apply in fields where pesticides have recently been applied, so check your re-entry interval (REI) before walking the block [4].
Optional but handy: a soil thermometer (some labs want soil temp at time of sampling), a small folding shovel for stony soils where a probe won't penetrate, and a cooler with ice packs if you're sampling in summer and can't refrigerate for a few hours.
How do you define sampling zones in a vineyard?
This is where most growers cut corners, then wonder why their amendment program flops. One composite sample per uniform management zone is the rule. A zone is defined by similarity in soil series, slope, vine variety, rootstock, and visible vine performance. If two areas of your vineyard consistently differ in vigor, color, or yield, they get separate samples.
Most extension programs cap routine testing at one composite sample per 5 acres, though WSU guidelines tighten that to 2-3 acres in highly variable soils [8]. A 20-acre block with uniform soil and consistent vine performance justifies four composite samples. That same block with a low-lying clay pocket in the middle and sandier loam on the ridge needs six at minimum.
Use your vineyard's own records. Old aerial imagery, NDVI maps, EC (electrical conductivity) surveys from an EM38 run, and yield monitor data all point to zones that behave differently. Cornell Cooperative Extension recommends overlaying these data layers before defining zones rather than drawing arbitrary grid lines [5].
Mark your zones on a paper map or in your field records software before you head out. Once you're walking rows with a probe, it's easy to drift off your intended boundary.
How deep should you pull vineyard soil samples?
Standard depth for grapevines is 0-12 inches for the top horizon and 12-24 inches for the subsoil, pulled as separate samples [1]. Don't mix the two depths into one bag. They reflect different nutrient dynamics and the lab needs to report them separately.
The 0-12 inch zone captures the bulk of your applied nutrients (lime, phosphorus, compost), microbial activity, and organic matter. The 12-24 inch zone matters most for salinity, boron, sodium, and for what rootstock roots actually meet at depth. In calcareous soils or under heavy irrigation (much of the Paso Robles area, for example), the subsoil sample can read two full pH units higher than the surface, and that changes your rootstock logic for any new planting [12].
On deep alluvial soils, a 24-36 inch pull is worth doing at least once, especially if you're seeing unexplained iron or manganese deficiency on the leaves. For routine monitoring, 0-12 and 12-24 gets the job done.
Strip off any surface mulch, cover crop residue, or decomposing material before you insert the probe. You're sampling the mineral soil horizon, not the duff layer.
How do you collect the subsamples and composite them correctly?
Within each zone, pull 15-20 individual subsamples. Walk a random zigzag or W-shaped pattern across the zone to avoid bias toward any single row or inter-row position. Pull from both the vine row and the mid-row in roughly equal proportion. Vine rows often accumulate more fertilizer and organic matter; mid-rows reflect the background soil chemistry more cleanly.
Insert the probe straight down, twist a half-turn, and pull up. Drop the core into your clean plastic bucket. Repeat until you have 15-20 cores. That process takes 20-30 minutes per zone once you're moving.
With all subsamples for a zone in the bucket, break up any clods by hand and mix thoroughly. You're building one representative composite from the variability across the zone. Remove roots, rocks bigger than a pebble, and obvious debris.
Fill your sample bag with roughly 1-2 cups (about 300-500 grams) of the composite. Most labs want that amount, and some will return excess to you, so check your lab's instructions first. Label the bag with the sample ID, zone name, depth, and date.
Never put samples from different depths in the same bag, even from the same zone.
How do you handle and ship samples to avoid contamination?
Timing matters more than most growers realize. If your soil is wet from rain or irrigation, wait 24-48 hours before sampling. Saturated soil is hard to pull cleanly and the excess moisture skews some readings, particularly nitrate.
Once your samples are composited, you have options. If you can ship same-day or next-day, keep the sealed bags cool and shaded (below 40 degrees F for overnight storage). If you're sampling late in the afternoon and can't ship until morning, put the sealed bags in a standard refrigerator. Don't freeze them. Freeze-thaw cycles alter microbial activity measurements and some nitrogen fractions [3].
Air-drying is the preferred storage method if you have a day or two before shipping. Spread the composite thinly on clean paper in a shaded spot with good airflow and let the moisture evaporate. Once dry, refill the sample bag and ship. Many labs prefer air-dried samples because they're more stable in transit.
Most labs take standard USPS, UPS, or FedEx. Use a rigid shipping box, not an envelope, so the bags don't get punctured. Seal each sample bag inside its own zip-lock bag as a backup. Include the submission form with grower name, farm address, field or block ID, depth, intended crops, and any recent amendments. Note recent lime or fertilizer applications, because they can temporarily spike certain numbers [9].
Which tests should you order for a vineyard soil panel?
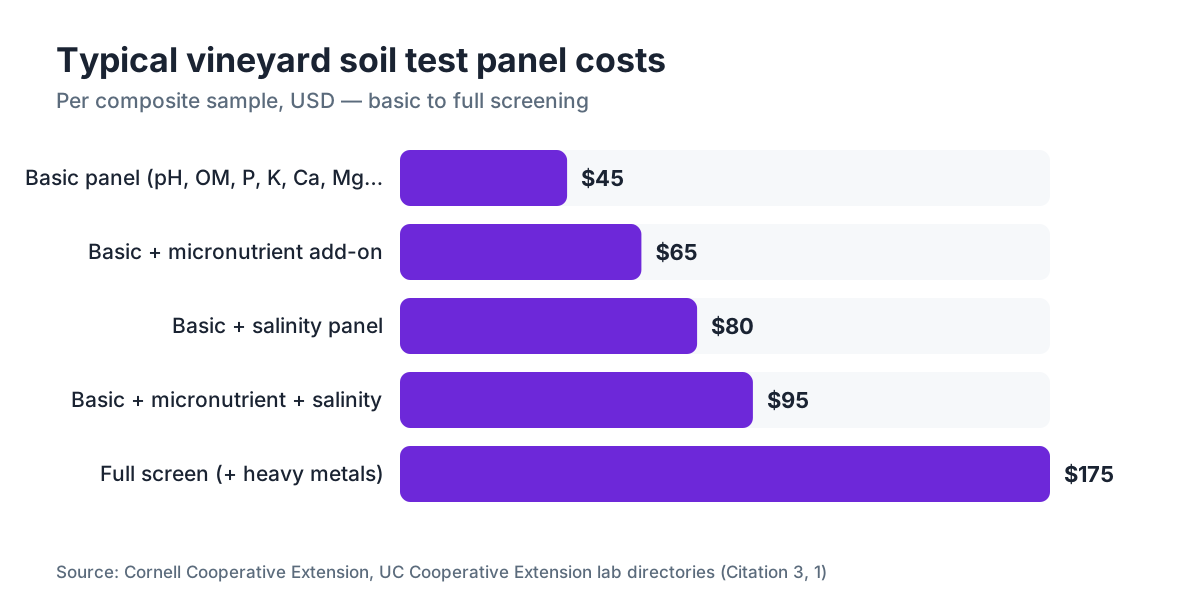
A basic panel covers pH, buffer pH (for lime requirement), organic matter, phosphorus (Mehlich-3 or Olsen method depending on your region), potassium, calcium, magnesium, and cation exchange capacity (CEC). That panel runs $30-$55 at most land-grant university labs and certified private labs [3].
For vineyards, add the micronutrient panel: boron, zinc, iron, manganese, and copper. Copper builds up from decades of Bordeaux mixture sprays, and without testing you won't know if you're near phytotoxic levels. The micronutrient add-on usually costs $15-$25 more.
Irrigating with recycled water? Buying land with unknown history? Seeing vine stress that doesn't match your fertility records? Add a salinity panel (EC, sodium, chloride, SAR) and a heavy metals screen. These aren't cheap (heavy metals alone can run $50-$150), so target them where there's a real reason.
For organic-certified vineyards, a total nitrogen (organic N) test and sometimes a biological soil health panel are worth adding every few years. They don't replace the standard chemistry panel, but they show how your compost and cover-cropping program is building long-term fertility.
The table below sums up the common panels, typical costs, and when each one earns its keep.
| Panel | Typical cost | When to order |
|---|---|---|
| Basic (pH, OM, P, K, Ca, Mg, CEC) | $30-$55 | Every 2-3 years, all vineyards |
| Micronutrient add-on (B, Zn, Fe, Mn, Cu) | $15-$25 | Every 2-3 years, older blocks |
| Salinity panel (EC, Na, Cl, SAR) | $20-$40 | Irrigated blocks, recycled water use |
| Heavy metals screen | $50-$150 | Unknown land history, old organic spray history |
| Biological / soil health | $60-$120 | Organic programs, every 3-5 years |
What do the lab results actually mean for grapevines?
pH is the number most growers check first, and for good reason. Grapevines do best between pH 5.5 and 7.0, with the sweet spot around 6.0-6.5 for most Vitis vinifera varieties on their own roots [1]. Below 5.5, manganese and aluminum can reach phytotoxic levels. Above 7.5, iron and zinc get locked up and you see lime-induced chlorosis, those interveinal yellowing patterns on young shoots.
CEC (cation exchange capacity) tells you how much nutrient-holding capacity your soil has. Sandy soils often read below 5 meq/100g; loam and clay soils read 15-30 meq/100g or higher. Low-CEC soil needs smaller, more frequent potassium and magnesium applications to avoid leaching. High-CEC soil holds nutrients longer but can lock up too much of one cation at the expense of another.
The calcium-to-magnesium ratio matters in wine grapes. A common target is Ca:Mg somewhere between 3:1 and 6:1 [5]. Badly imbalanced soils (especially those with excess magnesium from serpentine parent material or heavy dolomitic lime) interfere with potassium uptake and vine structure.
Phosphorus is usually adequate or in excess in established blocks. It doesn't leach readily and prior applications accumulate. The bigger risk in old blocks is copper. UC Davis research has documented copper exceeding 200 mg/kg in some California vineyard soils treated with Bordeaux mixture for decades [6]. At those levels, understand the risk to new vine establishment before replanting.
Keep results from every cycle. Year-over-year trending beats any single number. If your pH is creeping up 0.1-0.2 units per cycle in an irrigated block, that's actionable before you ever hit the threshold for concern.
What's the right time of year to collect vineyard soil samples?
Fall is the preferred window for most vineyard applications, after harvest and before winter rain leaches nutrients [2]. The soil is still workable, sampling foot traffic barely stresses vines heading toward dormancy, and you get results back in time to apply lime or pH amendments before winter, which needs months of contact time to react.
Spring sampling (bud swell to bloom) works for routine monitoring and is sometimes preferred for nitrate testing. The catch: you have less time to act before the growing season is underway, and lime applied then won't correct pH before harvest.
Avoid sampling within 6-8 weeks of a heavy lime application, fertilizer broadcast, or compost application. The numbers spike temporarily and won't reflect equilibrium soil chemistry [9]. If you must sample soon after an amendment, note the application on your submission form and ask the lab to flag possible interference.
In California's Mediterranean climate, the fall window usually means September through November. In the Pacific Northwest and New York's Finger Lakes or Hudson Valley, October is the workhorse month before ground freeze.
How do you record, track, and act on your soil test results?
A PDF sitting in your email inbox does nothing. The value of soil testing is comparing results across years and across zones, then tying those numbers to what you actually applied and what the vines showed in the field.
At minimum, build a spreadsheet that tracks sample date, zone ID, GPS coordinates, depth, lab name and report number, and one column per parameter (pH, OM, P, K, Ca, Mg, CEC, plus any add-ons). Color-code cells that fall outside target ranges. That's a 30-minute setup that pays for itself the first time you notice your west-block pH has been creeping up for six years.
If you manage multiple blocks or keep records for certified organic programs or third-party audits, a field operations platform like VitiScribe can attach lab reports to specific block records, timestamp amendments tied to those results, and flag zones overdue for testing. Software or spreadsheet, the record needs to be searchable and auditable. Some state certification programs and sustainability certifications require a documented soil testing history.
Once you have results, work amendments in this order: correct pH first (it unlocks or locks nearly every other nutrient), then major cation imbalances (Ca/Mg ratio), then phosphorus if truly deficient, then micronutrients. Don't dump everything on at once and assume more is better. Excess potassium suppresses magnesium uptake, and excess phosphorus ties up zinc.
How do certified labs and university extension programs help you interpret results?
The best labs don't just hand you numbers. They give you interpretation benchmarks specific to wine grapes and your region's soil types. UC Cooperative Extension, WSU Extension, and Cornell Cooperative Extension all publish crop-specific interpretation guides that turn raw lab numbers into amendment recommendations [1][2][5].
Many state university extension programs run their own certified labs or keep lists of accredited private labs. In California, UC Agriculture and Natural Resources provides lab directories and interpretation references [1]. WSU publishes soil test interpretation guides for Pacific Northwest conditions [2]. Cornell's "Nutrient Management Recommendations for Wine Grapes" is the standard reference for the eastern US, and it states plainly that growers should "combine soil test results with tissue analysis and visual observation" before deciding on amendments [5].
When you're choosing a lab, look for one certified under your state's agricultural lab accreditation program, or accredited nationally through A2LA (American Association for Laboratory Accreditation) [10]. The method matters too. Mehlich-3 extraction is the most common multi-element method in the eastern US and is spreading west, while some California labs still default to Olsen phosphorus. Ask which extraction method your lab uses so you can compare results across years if you ever switch labs.
Some private labs (A&L Western Laboratories, Waypoint Analytical, and similar regional labs) offer wine-grape-specific interpretation panels with amendment calculations included. That usually costs $10-$20 more than a raw-numbers report and saves you the lime calculation. Cornell's Agronomy Fact Sheet Series offers free lime and nutrient calculation worksheets if you'd rather do it by hand [11].
Frequently asked questions
How many soil samples do I need per acre in a vineyard?
The general rule is one composite sample (made from 15-20 individual probe pulls) per 5 acres of uniform soil type and vine management. Highly variable blocks may warrant one composite per 2-3 acres. Pulling fewer cores per zone or sampling fewer zones to save money is the most common mistake. It produces results you can't trust or act on with confidence.
Can I use a shovel instead of a soil probe for vineyard sampling?
You can, but it's harder to hold a consistent depth and each pull is a large, messy volume to composite. A soil probe (also called a soil auger or coring tool) gives a uniform core diameter and depth every time. In rocky soil where a probe won't penetrate, a small spade to open a hole plus a probe or scoop to extract the core is a reasonable workaround.
What pH should vineyard soil be for growing wine grapes?
Most Vitis vinifera varieties do best between pH 5.5 and 7.0, with 6.0-6.5 the practical target. Below 5.5, aluminum and manganese can turn toxic. Above 7.5, iron and zinc availability drops sharply and causes lime-induced chlorosis. Your rootstock choice shifts this tolerance somewhat, since some rootstocks handle higher pH better than others.
How long does it take to get vineyard soil test results back from a lab?
Standard turnaround is 5-10 business days at most university extension and private labs. Rush processing (24-72 hours) is available at many labs for an extra fee, typically $15-$30 per sample. If you're timing an amendment before winter, plan your sampling at least 3 weeks before you need results in hand.
How much does a vineyard soil test cost?
A basic panel (pH, organic matter, phosphorus, potassium, calcium, magnesium, CEC) runs $30-$55 per composite sample at university extension labs and most private labs. Adding a micronutrient panel brings the cost to roughly $50-$80. A full panel with salinity and heavy metals can reach $100-$200 per sample. University extension labs are usually the most affordable option.
Should I test vineyard soil at different depths?
Yes. Pull separate samples at 0-12 inches and 12-24 inches and keep them in separate labeled bags. The surface horizon tells you about applied nutrients, organic matter, and pH where most feeder roots concentrate. The subsoil sample reveals salinity, sodium accumulation, and the chemistry deeper roots meet, which is especially important when selecting rootstocks for new plantings.
What should I do if my vineyard soil pH is too high?
Elemental sulfur is the standard amendment to lower pH. Soil bacteria convert it to sulfuric acid, which acidifies the soil over several months. The rate depends on your buffer pH and CEC, so your lab report should include a recommendation, or use a UC Cooperative Extension or WSU calculation guide. In high-pH soils from calcareous parent material, the response is slower and repeated applications over years are often needed.
What is the best time of year to take vineyard soil samples?
Fall, after harvest and before heavy winter rain, is the standard recommendation from UC Cooperative Extension and WSU Extension. The soil is still accessible, you have time to apply lime before the ground freezes, and results inform your dormant-season amendment plan. Spring sampling (bud swell to bloom) is a second-best option but leaves less lead time for corrective action before harvest.
How do I sample vineyard soil that has received recent lime or fertilizer applications?
Wait at least 6-8 weeks after a surface lime, broadcast fertilizer, or compost application before sampling. Recent applications temporarily spike nutrient levels and won't reflect equilibrium soil chemistry. If circumstances force you to sample sooner, note the application date, product, and rate on your lab submission form so the lab can flag possible interference in its interpretation.
What do I do if my vineyard soil test shows high copper levels?
Copper builds up from repeated Bordeaux mixture and copper-based fungicide applications and doesn't leach quickly. UC Davis research has documented levels above 200 mg/kg in some long-farmed California vineyard soils. At elevated levels, reduce or stop additional copper applications, consider iron or organic matter amendments that partially bind copper, and factor copper toxicity risk into any replanting decision, since young vine roots are more sensitive than established ones.
Do I need to submit soil samples before planting a new vineyard?
Absolutely. This is the most important soil test you'll ever run on that land. Pre-plant testing lets you correct pH over multiple seasons, catch rootstock limitations from high pH or salinity, and apply deep-incorporated phosphorus and lime you can't work in once vines are established. Most extension programs recommend testing 1-2 years before planting for maximum lead time.
What's the difference between a soil test and a petiole test for vineyards?
A soil test measures nutrients present in the soil and potentially available to roots. A petiole test measures what the vine actually absorbed, the nutrient content of the leaf stem at a specific growth stage (usually opposite the basal cluster at bloom, or opposite the first cluster at veraison). Both are useful and complementary. Soil tests drive your amendment strategy; petiole tests confirm whether those amendments are working at the vine.
Which university extension programs publish vineyard-specific soil test interpretation guides?
UC Cooperative Extension (UC ANR) covers California conditions with wine-grape-specific guidelines. WSU Extension publishes soil test interpretation guides for Pacific Northwest vineyards. Cornell Cooperative Extension publishes nutrient management recommendations for eastern US wine regions including the Finger Lakes and Hudson Valley. All three are free to access online and are the primary reference standards for certified agronomists working in those regions.
Sources
- UC Agriculture and Natural Resources, Soil Sampling and Testing for Vineyards: Grapevines perform best in pH 5.5-7.0; sample every 2-3 years in established vineyards and annually in new plantings or when correcting deficiencies
- Washington State University Extension, Soil Sampling for Home Gardens and Small Acreages: WSU recommends annual sampling for young or replanted blocks and fall sampling after harvest as the preferred timing for Pacific Northwest vineyards
- Cornell Cooperative Extension, Soil Sampling Procedures: Avoid galvanized probes for zinc-sensitive analyses; air-drying is preferred storage method; basic panel costs approximately $30-$55 at most labs
- U.S. EPA, Worker Protection Standard for Agricultural Pesticides: Workers entering fields where pesticides have been applied must observe re-entry intervals (REIs) specified on the pesticide label under the EPA Worker Protection Standard
- Cornell Cooperative Extension, Nutrient Management Recommendations for Wine Grapes in the Northeast: Cornell recommends overlaying EC surveys, NDVI, and yield data before defining sampling zones; Ca:Mg ratio target of 3:1 to 6:1 for wine grapes; combine soil results with tissue analysis and visual observation
- UC Davis, Copper Accumulation in Vineyard Soils: UC Davis research documented copper accumulation exceeding 200 mg/kg in some California vineyard soils with long histories of Bordeaux mixture application
- WSU Extension, Soil Test Interpretations for Tree Fruits and Grapes: One composite sample per 2-3 acres recommended for highly variable soils in Pacific Northwest vineyards
- UC Cooperative Extension, Cover Crops and Soil Amendments for Vineyards: Sampling should be delayed 6-8 weeks after lime, fertilizer, or compost applications to allow nutrient levels to return to equilibrium
- American Association for Laboratory Accreditation (A2LA), Agricultural Testing Lab Accreditation: A2LA provides national accreditation for agricultural testing labs including soil chemistry panels used by vineyard managers
- Cornell Cooperative Extension, Agronomy Fact Sheet Series: Lime and Nutrient Calculations: Cornell Agronomy Fact Sheet Series provides free lime and nutrient application calculation worksheets for vineyard and field crop managers
- UC ANR, Integrated Pest Management for Grapes: Soil and Rootzone Management: Subsoil pH in calcareous California vineyard soils can read two full pH units higher than the surface horizon, directly affecting rootstock selection
Last updated 2026-07-10