How to take soil samples for a vineyard (the right way)
TL;DR
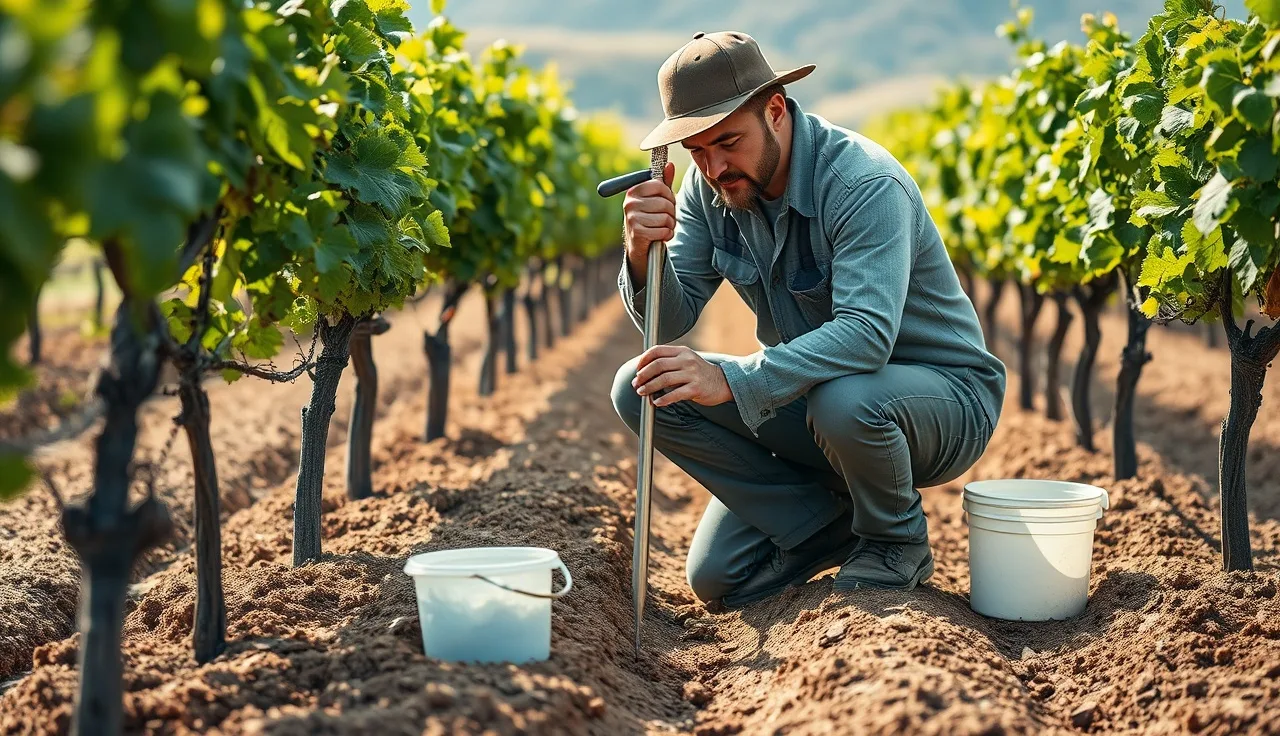
- Pull 15-20 soil cores per sampling zone to a depth of 12 inches for nutrient work, plus a separate 12-24 inch pull for subsoil pH and nitrate.
- Composite them in a clean plastic bucket, take the surface wet off, and ship within 48 hours.
- Sample in fall after harvest or early spring before bud break.
- One lab analysis per 5-10 acres is the standard starting point.
Why soil sampling actually matters for grape growing
Grapevines are perennial. You don't get a do-over on a pH problem the way a vegetable grower can lime and replant in a season. A soil that's too acidic locks up phosphorus and molybdenum. One that's too alkaline locks up zinc, iron, and manganese. You won't see it as a soil problem at first. You'll see it as a vine problem, and you'll spend real money on foliar sprays before someone finally suggests a soil test.
The other reason is money and paperwork. Every time you apply lime, gypsum, sulfur, manure, compost, or synthetic fertilizer, your input records should show why. Regulators and certifying bodies want applications based on documented need, not habit. A soil test report is that documentation.
Nobody has clean data on the average yield loss from uncorrected nutrient imbalances. The closest guidance from UC Agriculture and Natural Resources estimates that correcting a real pH problem (say, from 5.5 to 6.5 in a Cabernet block) can improve nutrient availability tied to cation exchange capacity by 20-30%, which changes how well your fertilizer actually works [8].
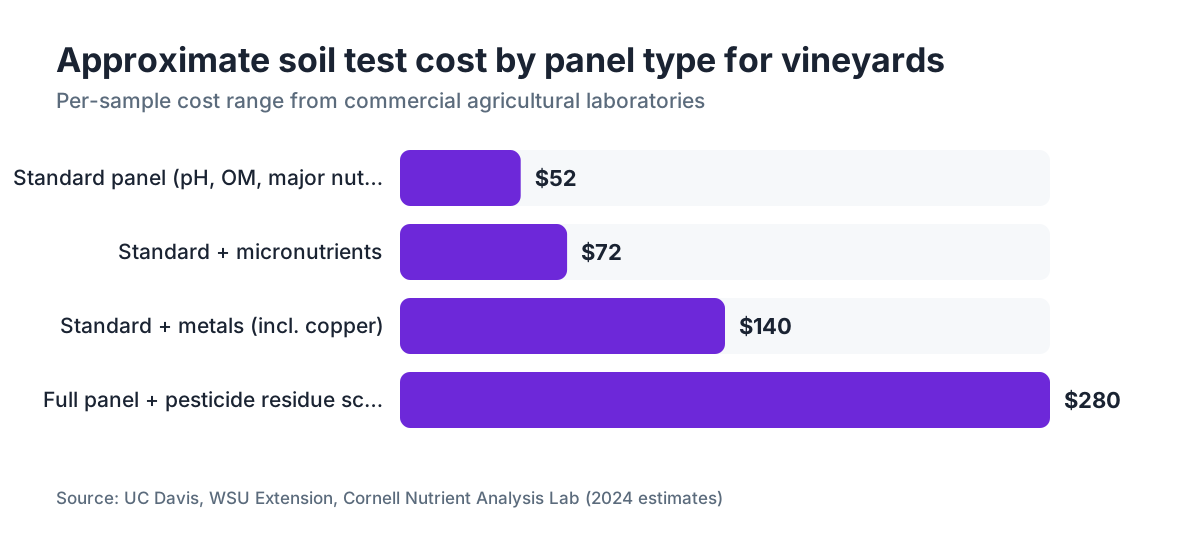
Soil sampling is cheap next to what you spend on amendments. A standard panel from a commercial ag lab runs roughly $25-$80 per sample depending on the package [2]. Skipping it to save $50, then applying $800 of lime you didn't need, is a bad trade.
When should you take soil samples in a vineyard?
The two best windows are fall (after harvest, before the soil freezes) and early spring (before bud break, before you've applied anything). Either works for most nutrients. The one rule that matters more than the season is consistency: if you sample every two years, sample at the same time of year so the numbers compare.
Fall usually wins in cooler climates because the soil is still biologically active and nutrient cycling hasn't shut down. Spring makes more sense in arid regions where fall rains can leach nitrate and move your baseline. WSU Extension recommends sampling Washington vineyards in fall or early winter before any amendments go on, which keeps the baseline clean [3].
Don't sample within 60 days of a real fertilizer or amendment application. Soluble nutrients haven't settled yet, and your results read high or low depending on what you put down. Same goes for the days right after a heavy rain, which can shift pH in the top few inches.
On a new site, sample before you plant. You want baseline numbers on pH, organic matter, and elements like boron or sodium before you set posts and wire. Fixing a boron toxicity problem after the vines are in is much harder than handling it during site prep.
How many soil samples do you need per vineyard block?
One composite sample per distinct soil management zone, with zones usually covering 5-10 acres. That's the standard from both UC Cooperative Extension and Cornell's viticulture program [1][4]. A composite is 15-20 individual cores pulled from random spots inside that zone and mixed in one bucket before it goes to the lab.
What makes a zone? Soil type drives it. A block that runs from sandy loam on the valley floor to clay on a hillside is two zones. Topography counts too, since low spots that hold water behave nothing like a well-drained ridge. Vine vigor is the practical shortcut. If the southeast corner of a block is always weaker than the rest, sample it separately instead of blending it into one average.
For a first sampling of an established vineyard, oversample. Pull one composite per 5 acres rather than per 10. You'll spend maybe $100-$150 extra in lab fees, and you'll learn whether the site is genuinely uniform or hiding variability you've been managing around blind.
None of this is law. The idea is simple: 15-20 cores averaged into one sample smooths out small variation that doesn't need separate management, while keeping zones distinct enough that you're not blending two different soils into a single meaningless number.
| Vineyard size | Minimum zones to sample | Cores per composite | Approx. lab cost range |
|---|---|---|---|
| Under 5 acres | 1-2 | 15-20 | $25-$80 per sample |
| 5-20 acres | 2-4 | 15-20 | $25-$80 per sample |
| 20-50 acres | 4-8 | 15-20 | $25-$80 per sample |
| Over 50 acres | 1 per 5-10 acres | 15-20 | $25-$80 per sample |
What equipment do you need to take vineyard soil samples?
You don't need much. The main tool is a soil probe or auger. A probe is a hollow tube, usually 3/4 to 1 inch across, that you push into the ground and pull out with a core inside. A hand probe works fine in loamy or sandy soils. A slide-hammer probe or a tractor-mounted hydraulic unit earns its keep in clay or rocky vineyard soils, where hand-pushing 15 cores per zone will wreck your wrists.
A basic stainless steel hand probe (Oakfield tube-type or similar) costs $40-$80 and lasts decades. Skip galvanized or plain steel probes. Zinc from the plating leaches into the sample and skews your micronutrient results [2].
Other gear:
- A clean 5-gallon plastic bucket for compositing. Not metal. Residue from galvanized buckets contaminates the sample.
- A permanent marker to label bags.
- Zip-lock bags or the paper bags your lab provides (many labs ship bags with the submission form).
- A GPS or phone to mark each zone so you can resample the same spots in two years.
- A phone camera to shoot anything odd, like a color transition or a hardpan layer you hit at 8 inches.
Rinse your probe with water between zones. Moving from a block that got sulfur to one that didn't? A quick wipe stops cross-contamination.
How deep should you sample vineyard soil?
For routine nutrient and pH work, pull one set of cores to 12 inches and a second set from 12-24 inches to capture subsoil pH and nitrate. Cornell's viticulture program recommends exactly these two increments: 0-12 inches for standard nutrients, 12-24 inches for subsoil pH and available nitrate, which can be high in vineyards with a history of heavy nitrogen inputs [4].
Why does subsoil pH matter? Grape roots go deep. Cabernet and Merlot on many rootstocks send roots 3-6 feet down in well-drained sites. If your topsoil sits at pH 6.5 but the subsoil drops to 5.0, you have an aluminum toxicity problem below the zone surface lime can easily reach. WSU notes that surface lime does little for subsoil pH without deep incorporation [7].
For pre-plant sampling on a new site, go deeper. An 18-36 inch pull (or split into 0-18 and 18-36 inch increments) tells you what the roots will hit once established, and whether there's a restrictive layer, hardpan, or calcium carbonate buildup that'll choke drainage.
Most managers pull a 0-12 inch composite for the annual or biennial nutrient panel, then add the deeper pull every 3-4 years or when a big amendment decision is on the table. That's a fair balance of cost and information.
How do you actually pull and composite the cores?
Walk a zigzag or W-shaped transect through the zone. The point is to avoid bias toward any one spot. Don't just sample down the row closest to the road.
Push the probe to your target depth (12 inches for the shallow set), then pull it straight out. The core should stay intact in the tube. Tap it into your clean bucket. Repeat 15-20 times across the zone, all into the same bucket.
Once every core is in the bucket, break up the clods with clean dry hands and mix hard. The soil should look uniform, not streaky with different-colored layers.
Scoop about 1-2 cups of the mixed soil into a bag. The bag doesn't need to be full. Most labs want about a pint. Label it with the zone name or number, the date, the depth, and your vineyard ID.
Wet soil needs to dry a little first. Spread it on clean paper or plastic for 30-60 minutes before bagging. Excess moisture grows mold in the bag during shipping and can throw off organic matter readings. You're taking the surface wet off, not drying it to bone. No heat, not even low heat. Heat drives off ammonium and alters organic matter [9].
Ship within 48 hours. If you have to wait a day or two, refrigerate the samples. Never freeze them [9]. Most labs turn standard panels around in 5-10 business days.
Should you sample under the vine or between rows?
This one is genuinely contested in viticulture, and there's no clean consensus. The case for under-vine sampling: that's where your fertilizer and irrigation land, especially in drip blocks, so it's the most relevant zone for fertilizer calls. The case for mid-row: under-vine soil gets disturbed by herbicide programs and concentrated inputs, which makes baseline pH and organic matter harder to read.
WSU Extension's protocol for wine grape vineyards pulls cores in the vine row rather than the middle of the inter-row, because that's where root density is highest and where your management actually lands [3]. UC Cooperative Extension guidance is similar, suggesting cores within 12-18 inches of the trunk for nutrient work [1].
Here's the practical answer: be consistent. Sample under the vine this year, sample under the vine next time. Year-over-year trend data beats any single sample, and switching your position kills the comparison.
In drip blocks with a fertigation history, pull one extra set once: some cores from directly under the emitter, some from the edge of the wet bulb. That shows you how much nutrient has concentrated near the drip line, and it gives you context for reading your standard samples without complicating every future round.
What soil tests should you order for a vineyard?
The standard vineyard panel at most ag labs covers pH, buffer pH (for lime rate), organic matter, phosphorus, potassium, calcium, magnesium, sodium, cation exchange capacity, and usually a base saturation breakdown [2]. That runs $25-$50 at most labs.
Add micronutrients (iron, zinc, manganese, copper, boron) if you're seeing deficiency symptoms or haven't tested the site before. Copper deserves its own look in vineyards with a long fungicide history. Copper builds up under old Bordeaux-style programs, and soil copper above roughly 100-200 mg/kg can slow root growth and knock down microbial activity [5].
A standard soil test does a poor job on nitrogen, because inorganic N is mobile and changes fast. Most viticulture programs point to petiole tissue sampling (mid-bloom or veraison) as the better nitrogen tool, using soil nitrate as backup rather than the main read [1][4].
If the site has any pesticide history, or you're moving toward organic certification, order a separate residual herbicide test and a metals panel. These run $100-$300 on top of the standard work, but they're a one-time due-diligence cost, not something you repeat every cycle.
For the full soil-to-vine picture, pair your soil samples with petiole analysis at bloom or veraison. Together they tell you what's in the soil and what the vine is taking up, which beats either one alone.
How do you read and use the soil test results?
Lab reports come with sufficiency ranges, usually labeled low, medium, optimum, high, and excessive for each nutrient. These ranges are calibrated by crop. Ask the lab flat out for wine grape sufficiency ranges if they're not on the report; some labs default to general orchard fruit ranges, which don't fit Vitis vinifera.
pH is your starting point. The target for most wine grapes is 6.0-6.5 for balanced mineral nutrition, though some rootstocks handle 5.5-7.0 fine [1]. Below 5.5, aluminum and manganese toxicity get likely. Above 7.5, iron and zinc chlorosis shows up, especially on young vines.
Potassium is the number that surprises people. Vineyards across the western US often run high or excessive on K, not deficient. High soil K competes with magnesium uptake and can raise wine pH by shifting the tartrate-to-malate ratio in the berry, a real quality problem in warm-climate reds [3]. If your test reads potassium above 300-400 ppm, stop adding K, and take a hard look at your compost as a source.
Organic matter in western US wine vineyards usually runs 0.5-2%, low next to row crop benchmarks. That's not automatically a problem, since vines tolerate low OM soils well. But under 0.5% means a soil that holds water and nutrients poorly, and a cover crop program is usually the best long-term fix.
Keep a record of every result, the date, the zone, and the depth. If you're managing data across several blocks, a field operations tool like VitiScribe can attach the lab PDFs straight to the block record, so you're not digging through email three years later when someone asks why you limed Block 5 in 2022.
What do worker protection and safety rules apply to soil sampling?
Soil sampling isn't a pesticide application, so the EPA Worker Protection Standard doesn't govern the sampling itself. It does apply to your field workers if sampling happens during or shortly after a restricted-entry interval from a pesticide application [6].
The WPS, codified at 40 CFR Part 170, defines early-entry activities and requires that workers entering a treated area during an REI have pesticide safety training, access to the PPE listed on the product label, and decontamination supplies provided by the employer [6]. If your sampling crew walks into a block within the REI for a recent fungicide or herbicide, that's early entry, and WPS applies.
The practical move: schedule sampling outside REI windows whenever you can. Most REIs for common vineyard fungicides run 4-24 hours, so a day's delay clears it. Keep spray records current so you know exactly when the last application went in and when the REI expires. Using a contractor crew? Confirm they've had WPS safety training and that you've handed over the required application information.
For the sampling itself, soil in vineyards with a copper fungicide history can carry elevated copper. Standard practice is nitrile gloves and washing hands before eating. No regulation formally requires this for soil contact, but extension programs recommend it as basic hygiene [5].
How often should you resample vineyard soil?
Every 2-3 years for established vineyards. That's the standard from most extension programs [1][3][4]. Annual sampling is usually overkill and doesn't give the soil enough time to show real change from amendments. Four or five years between samples is too long if you're actively working on pH or making big amendment calls.
After a lime application, wait at least 12-18 months before resampling the treated zones. Lime reacts slowly, especially in dry conditions, and a test at 3 months will underestimate the final pH change.
For blocks you're actively correcting, 2 years is the right interval. For stable blocks where pH and nutrients have sat in the target range for several cycles, stretch to 3 years without losing much.
Keep a sampling log: date, zone ID or GPS coordinates, depth, lab name and sample ID, and results. That log is both a management tool and a paper trail. If you're in a USDA conservation program or a certified sustainability program like the California Sustainable Winegrowing Alliance, documented soil testing is often a scored practice [11].
Common mistakes to avoid when soil sampling a vineyard
A galvanized bucket or probe is the most common contamination mistake. Zinc leaches from the coating and inflates your zinc result, which can push you into an application decision you didn't need.
Too few cores per composite is the second one. Pull 5 cores instead of 15-20 and you're not capturing the variability of the zone, so the composite is unreliable. The math is straightforward: each core you add sharpens the composite average, and most sampling-design work puts the point of diminishing return around 20 cores per zone [2].
Sampling at the wrong time for your region. Sampling right after heavy rain in a leaky sandy soil makes potassium look lower than it is. Sampling in summer, when soils are hot and dry, concentrates some nutrients near the surface. Stick to fall or early spring.
Mixing protocols between years. Go from under-vine to mid-row, or 12-inch to 8-inch depth, and you've snapped your trend line. Document the protocol and repeat it exactly.
Ignoring the subsoil. Most managers pull 0-12 inches and never look deeper. If your topsoil pH is fine but you're seeing iron chlorosis anyway, the problem might sit 18 inches down where the roots spend most of their time.
Throwing away the GPS points. Mark where each zone was on a map after you sample. It sounds obvious and it still gets skipped, and two years later you're guessing whether you hit the same zone or the one next door.
Frequently asked questions
How many soil samples per acre in a vineyard?
The standard is one composite sample per 5-10 acres, where each composite is 15-20 individual cores pulled from across that zone. For a first sampling of a new or variable site, pull one composite per 5 acres to see whether there's variability worth managing separately. UC Cooperative Extension and WSU both use this 5-10 acre zone guideline as a starting point.
What time of year is best for vineyard soil sampling?
Fall after harvest is the most common recommendation, before soil temperatures drop and before any fall amendments go on. Early spring before bud break is a valid alternative. Avoid sampling within 60 days of a fertilizer or amendment application, and avoid sampling right after heavy rain, which can shift pH and leach mobile nutrients like nitrate.
How deep should vineyard soil samples be taken?
For routine nutrient and pH work, 0-12 inches captures the active root zone and the amendment-affected layer. A separate 12-24 inch pull gives you subsoil pH and residual nitrate, which matters for deep-rooted rootstocks or a history of heavy nitrogen inputs. On a new pre-plant site, consider sampling down to 36 inches to catch restrictive layers or pH problems below the plowline.
Can I take vineyard soil samples myself or do I need to hire a consultant?
You can do it yourself. The equipment is minimal (a stainless steel probe, a clean plastic bucket, sample bags), and the technique is straightforward. You'd hire a consultant to interpret results and build an amendment plan, not for the physical sampling. Plenty of vineyard managers sample their own blocks and send results to a PCA or viticulture consultant for interpretation.
What soil pH is ideal for wine grapes?
Most wine grape varieties and rootstocks do best at pH 6.0-6.5, where major nutrient availability peaks and aluminum and manganese toxicity stay low. Some rootstocks (like 5BB or 420A) tolerate higher pH up to 7.5. Below pH 5.5, aluminum toxicity becomes a real concern. UC Cooperative Extension and WSU viticulture programs both cite 6.0-6.5 as the general target.
What's the difference between a soil test and a petiole test for vineyards?
A soil test tells you what nutrients are present and available in the rootzone. A petiole test (tissue analysis) tells you what the vine is actually taking up. They answer different questions. Soil tests guide amendment decisions for pH, phosphorus, potassium, and calcium. Petiole analysis is better for nitrogen management and catching mid-season micronutrient deficiencies. Running both gives you the most complete picture.
How much does a vineyard soil test cost?
A standard soil panel (pH, organic matter, major nutrients, CEC) runs roughly $25-$80 per sample depending on the lab and package. Micronutrient add-ons are typically $10-$30 extra. A full metals panel or pesticide residue screen can add $100-$300. For most vineyards doing a routine check-up, expect $50-$100 per zone for a well-specified panel.
Do I need to sample soil separately for each grape variety or rootstock?
Not by variety alone. The more useful split is by soil management zone: areas that differ in texture, drainage, topography, or observed vine vigor. Different rootstocks planted on genuinely different soil types should be sampled separately. If you have Cabernet on a deep sandy loam and Chardonnay on a clay hillside, sample those zones independently regardless of variety.
How do you sample soil in a drip-irrigated vineyard?
WSU recommends pulling cores within the vine row in drip-irrigated vineyards, because that's where root density is highest and where applied water and nutrients concentrate. In blocks with a long fertigation history, pull one supplemental set of cores from directly under the emitter (versus at the edge of the wetted zone) at least once. That shows you how much nutrient has built up near the drip line.
What contaminants should I test for in vineyard soil?
Copper is the most common concern in wine vineyards with a Bordeaux mixture or copper fungicide history. Concentrations above 100-200 mg/kg can slow root growth and soil biology. If you're transitioning to organic certification or buying an established vineyard, a copper test and general metals panel is worth the cost. Residual herbicide testing is smart if the site had a different prior land use or an intensive pre-emergent program.
What lab should I send vineyard soil samples to?
A&L Western Laboratories (Oregon), Waypoint Analytical (labs across the US), and the University of California's Division of Agriculture and Natural Resources lab network are well-regarded for western wine regions. The Cornell Nutrient Analysis Laboratory is common in the Northeast. Ask your local Farm Advisor or PCA for their preferred lab; they often have calibrated sufficiency ranges for your specific region and crop.
How do I track and store soil test records for a vineyard?
At minimum, keep a spreadsheet or file folder with the lab report PDF, the date, the zone name, the GPS coordinates of where you sampled, and the depth. If you're managing multiple blocks or multiple vintages of data, a field operations platform like VitiScribe lets you attach lab reports directly to block records so amendment history and test results stay connected. You'll want this documentation if you enter a USDA conservation program or a sustainability certification.
Does the EPA Worker Protection Standard apply to soil sampling in a vineyard?
WPS doesn't cover the sampling activity itself, but it does apply if you enter a treated block during a restricted-entry interval from a recent pesticide application. Under 40 CFR Part 170, workers entering a treated area during an REI must have pesticide safety training, proper PPE per the label, and access to decontamination supplies. The easiest fix is to schedule sampling outside active REI windows, which most managers can do with a day's planning.
How do you read a vineyard soil test report?
Start with pH and work outward. Check whether your pH sits in the 6.0-6.5 target range, then look at CEC (how well the soil holds nutrients), then review individual nutrient levels against the lab's sufficiency ranges. Ask for wine grape-specific ranges if they're not pre-loaded. High potassium is the most common finding in western US vineyards and warrants attention because it affects wine pH and magnesium uptake. Cross-reference with your petiole data for the fullest picture.
Sources
- UC Cooperative Extension / UC Agriculture and Natural Resources, Nutrient Management Guidelines for Wine Grapes: One composite sample per 5-10 acres; target pH 6.0-6.5 for wine grapes; fall or early spring sampling recommended; pair soil tests with petiole analysis at bloom or veraison
- University of California, Davis, Plant and Soil Science Laboratory, Soil Sampling Guidelines: Standard soil panel costs roughly $25-$80; use stainless steel probes (not galvanized); 15-20 cores per composite; diminishing returns above 20 cores
- Washington State University Extension, Nutrient Management for Wine Grapes in the Pacific Northwest (EM067E): Sample in fall or early winter before amendments; pull cores in the vine row for drip-irrigated blocks; high soil K competes with magnesium and can elevate wine pH
- Cornell University, College of Agriculture and Life Sciences, Viticulture and Enology Program, Soil and Petiole Sampling Guidelines: Sample 0-12 inches and 12-24 inches in separate increments; subsoil nitrate is significant in vineyards with heavy historical nitrogen inputs; resample every 2-3 years
- UC Agriculture and Natural Resources, Copper in Vineyard Soils (Publication 8133): Copper accumulation above 100-200 mg/kg can inhibit root growth and microbial activity in vineyard soils with long history of copper fungicide use
- U.S. Environmental Protection Agency, Worker Protection Standard (WPS), 40 CFR Part 170: Workers entering a pesticide-treated area during a restricted-entry interval must have safety training, appropriate PPE, and access to decontamination supplies per 40 CFR Part 170
- WSU Extension, Soil pH Management in Pacific Northwest Vineyards: Vineyards with subsoil pH below 5.5 face aluminum toxicity risk; surface lime applications have limited effect on subsoil pH without deep incorporation
- UC Agriculture and Natural Resources, Western Fertilizer Handbook, Viticulture Edition: Correcting soil pH from 5.5 to 6.5 can improve cation exchange capacity nutrient availability by 20-30% and improve fertilizer use efficiency
- Cornell Nutrient Analysis Laboratory, Sample Submission and Handling Guidelines: Soil samples should be shipped within 48 hours or refrigerated (not frozen) to prevent microbial activity changes; avoid heat drying which can alter ammonium readings
- California Sustainable Winegrowing Alliance, California Code of Sustainable Winegrowing Workbook: Documented soil testing is a scored practice in California Sustainable Winegrowing certification programs
Last updated 2026-07-09