Preparing soil for a vineyard: the complete practical guide
TL;DR
- Preparing soil for a vineyard takes 1 to 3 years and usually costs $3,000 to $12,000 per acre depending on drainage work, amendments, and subsoil conditions.
- The core steps: test soil and tissue, correct pH and nutrient gaps, deep rip compacted subsoil (18 to 36 inches), install drainage, and grow a cover crop before the vines go in.
Why does soil preparation matter so much before planting vines?
Vines are long-lived perennials. A Cabernet Sauvignon block you plant this fall might still be making fruit in 2055. You get one real shot at the subsoil. Once a vine's roots are established, you can't go back and rip a hardpan layer out from underneath it without wrecking the plant. That single fact is what separates pre-plant soil work from anything you do in an annual crop.
Roots in badly prepared soil stay shallow. Shallow roots mean the vine leans hard on irrigation and gets far more sensitive to heat and drought. Deep roots pull water and minerals from well below the surface. That's part of why old vines on undisturbed, well-structured ground often beat younger vines on heavily managed sites.
UC Cooperative Extension guidance points to poor internal drainage as the most common soil-related cause of vine failure in the first decade [1]. Getting drainage right before planting pays for itself, even when the year-one invoice stings.
For how soil fits into the full picture of running a vineyard, the fundamentals here apply whether you're establishing a boutique estate or a larger production block.
When should you start preparing soil before planting vines?
Start two to three years before you want to plant, if you can swing it. That window isn't padding for paperwork. It's real time for lime to move down through the profile and correct pH at depth, for cover crops to cycle organic matter, and for you to watch where the water actually goes after a hard winter rain.
Bare minimum, start 12 months out. That gives you time to test, amend, rip, shape beds if needed, and grow a pre-plant cover crop. UC Cooperative Extension recommends sampling soil at least a year before planting so amendments can be worked in and react before roots ever reach them [1].
Here's a rough timeline that holds up in most temperate wine regions:
| Phase | Timing before planting | Key tasks |
|---|---|---|
| Soil testing | 18-24 months out | Composite samples, nematode assay, percolation test |
| Amendment & deep tillage | 12-18 months out | pH correction, phosphorus, potassium, subsoil ripping |
| Cover crop cycle 1 | 8-12 months out | Legume mix to fix nitrogen, build organic matter |
| Drainage installation | 6-12 months out | Tile drains, swales, check beds during wet season |
| Pre-plant fumigation (if needed) | 3-6 months out | Only if nematode pressure confirmed |
| Cover crop cycle 2 or mow-down | 1-3 months out | Incorporate or leave as mulch before planting |
On a compressed timeline, put deep tillage and drainage ahead of everything else. Foliar sprays can patch some nutrition gaps after planting. You cannot fix a compacted subsoil or a plugged drain from the surface once the vines are in.
What soil tests do you need before establishing a vineyard?
Standard agronomic testing is the floor, not the ceiling. Vineyard soil testing goes several layers past what most row-crop labs run by default. Order these:
Standard soil chemistry panel: pH, organic matter, CEC (cation exchange capacity), and macronutrients (N, P, K, Ca, Mg, S). This is your baseline. Most university extension labs charge $20 to $50 per sample, and commercial labs run $30 to $80 [2].
Micro and trace elements: boron, zinc, manganese, iron, copper. Grapevines have real sensitivities here. Zinc deficiency shows up all over Pacific Coast soils; boron deficiency turns up across many western and some eastern sites.
Nematode assay: if the ground ever grew grapes, stone fruit, tomatoes, potatoes, or perennial grasses, test for root-knot nematodes (Meloidogyne spp.) and dagger nematodes (Xiphinema index, which carries grapevine fanleaf virus). A positive result rewrites your whole rootstock and fumigation plan. WSU Extension recommends nematode testing before any new vineyard planting in the Pacific Northwest [3].
Soil texture and structure: particle size analysis (percent sand, silt, clay) tells you about water-holding capacity and how the soil drains. This matters most if you're pulling soil data from a survey instead of running physical percolation tests yourself.
Percolation and internal drainage: this one is physical, not chemistry. Dig a hole 24 to 30 inches deep, fill it with water, let it drain fully, refill it, and time the second fill. Anything slower than 0.5 inches per hour is a problem. Below 0.2 inches per hour in the root zone is a serious problem.
Sampling strategy counts as much as what you test. Take composite samples across the block, at least one per distinct soil type or color change you can see. Sample two depths separately: 0 to 12 inches and 12 to 24 inches. A block that looks uniform up top often hides very different subsoil chemistry.
Send samples to a lab that reads grapevines, or use UCCE-calibrated interpretation ranges. Generic agronomic recommendations are calibrated for corn or wheat and will push nutrient levels higher than vines ever need.
What is the right pH for a vineyard, and how do you adjust it?
Grapevines do best at a soil pH between 5.5 and 7.0, with 6.0 to 6.5 the sweet spot for nutrient availability on most rootstocks [1]. Below 5.5, manganese and aluminum can reach toxic levels. Above 7.5, iron, zinc, and boron get harder to take up, and lime-induced chlorosis starts showing on susceptible rootstocks.
Raising pH: apply ground agricultural limestone, calcitic or dolomitic. Calcitic lime is pure calcium carbonate. Dolomitic adds magnesium alongside the calcium, which matters if your Mg:Ca ratio is off. How much you need depends on starting pH, target pH, and CEC. On a sandy soil with low CEC, 1 to 2 tons per acre might move pH a full unit. On a high-CEC clay loam, you might need 4 to 6 tons for the same shift. Your lab gives you a lime rate if you include a buffer pH test [2].
Lime needs time and mixing. Apply it before deep tillage so the ripper or disc works it into the profile. Surface-applied lime on an established vineyard crawls down, maybe 1 to 2 inches per year. That's exactly why you fix pH before planting.
Lowering pH: apply elemental sulfur, which soil bacteria oxidize into sulfuric acid over several months. On alkaline soils (pH 7.5 and up) in parts of California's Central Valley, Paso Robles, and eastern Washington, acidifying fertilizers like ammonium sulfate or sulfur-coated urea help hold pH lower over time. Acidifying a naturally high-pH soil is a long game, not a one-time fix.
A word on limestone subsoils. If your pH is high because of calcareous parent material, you match the rootstock to the chemistry instead of trying to out-chemistry the geology. 41B, 140Ru, and Fercal are the standbys for high pH and free lime. No amount of sulfur beats an acre of solid calcium carbonate bedrock sitting at 18 inches.
How deep should you rip or till the soil before planting vines?
If your site has any compaction layer, hardpan, or restrictive claypan above 24 inches, deep rip it before planting. No exceptions. The point is to break barriers to root growth and get water moving vertically.
Depth: aim for 24 to 36 inches. A standard subsoiler shank reaches 18 to 24 inches. For more, a D8 or D9 tracked dozer with a deep ripper attachment gets to 36 inches on many sites. On rocky ground, you work with what the rock allows.
Spacing: run rip passes on your vine row spacing, then cross-rip perpendicular if the budget allows. Cross-ripping at a 45-degree angle shatters hardpan across the whole block instead of leaving undisturbed lanes between rip channels.
Moisture: rip when the soil is dry enough to fracture and shatter, not wet enough to smear and re-compact. Ripping wet clay leaves slick, glazed rip walls that roots can't push through.
On sites with no hardpan, a single deep disc pass and a finish disc usually does it. Don't rip just to rip. Needless tillage wrecks soil structure and burns money. If your percolation test passed and there's no obvious impermeable layer, a soil probe run 30 inches deep confirms it without a big equipment day.
One case that catches people off guard: former orchard ground. Old orchard soils often carry compaction from decades of tractor traffic in fixed rows, plus root channels from pulled trees that make drainage pockets uneven. Walk former orchard ground carefully before you rip. That hour is time well spent.
Does your vineyard site need drain tile or surface drainage?
Plenty of vineyards die slow deaths from waterlogged roots, and the grower never connects the dots because the symptoms mimic nutrient deficiency or trunk disease. Standing water at 18 to 24 inches during the dormant season is a root health problem even when the surface looks bone dry.
When to install drain tile: if your percolation test comes in under 0.5 inches per hour, or you find a perched water table at 24 inches or less during the wet season, tile drainage deserves a hard look. French drains and perforated plastic tile on 20 to 40 foot centers move enough water off a block to drop a perched water table by 12 to 18 inches.
Cost: tile drainage runs roughly $1,500 to $4,000 per acre depending on depth, spacing, and soil, based on ranges reported by growers in California and the Pacific Northwest. It's a real line item, and it's a big reason establishment costs swing so far between sites.
Surface drainage: shape the land so water runs off the block, not across the rows. A 1 to 2 percent grade toward a swale or outlet usually does the job. On flat ground, raised beds (hilled rows) lift vine roots 6 to 12 inches above the ambient drainage level. Raised beds plus inter-row swales handle a lot of drainage trouble on moderate sites.
For growers on sites like the coastal country around Paso Robles wineries, or anywhere with sharp wet-dry seasons, getting drainage infrastructure right before planting pays off big, because how you handle water during the wet dormant season drives vine health for decades.
What amendments should you incorporate before planting grapevines?
Work a priority order. Not everything the lab flags needs to go in before planting. Some things fix easily after establishment. Others you can't fix without pulling vines.
Priority 1, apply pre-plant and incorporate:
- Lime or sulfur for pH correction (takes months to react; has to be mixed in)
- Phosphorus: barely moves in soil once applied. You get one chance to place it in the root zone. Broadcast and rip it in. Target 25 to 50 ppm Mehlich-3 P for grapevines [1].
- Potassium: also slow to move. If you're below 100 to 150 ppm, apply as potassium sulfate or potassium chloride before ripping. Potassium chloride is cheaper but adds chloride, which grapevines tolerate at moderate levels.
- Gypsum (calcium sulfate): helps on sodic (high-sodium) soils and where you want more calcium without raising pH. Also loosens tight clay through flocculation.
Priority 2, manageable after planting but easier to fix pre-plant:
- Organic matter: compost at 4 to 8 tons per acre before incorporation improves CEC, water holding, and microbial activity. The gain is real but modest; it takes years of cover crop cycling to move organic matter percentage much.
- Zinc and boron deficiencies: correctable with foliar sprays after planting. If soil levels are severely low, a pre-plant broadcast and incorporation helps, but it won't block you from planting.
What not to overdo: nitrogen. Grapevines don't need much of it, and most sites with any organic matter or cover crop history already have enough. Overloading nitrogen pre-plant drives excess vegetative growth in the first two seasons and delays canopy balance. Growers coming from annual-crop fertility thinking make this mistake constantly.
Keep detailed records of what you apply, at what rates, on what dates. If your state requires a Nutrient Management Plan or you're chasing any sustainability certification, this documentation is the foundation. Tools like VitiScribe let you log pre-plant amendments right alongside your ongoing spray and irrigation records, so nothing slips through the cracks when audit time comes.
Should you plant a cover crop before installing grapevines?
Yes, almost always. A pre-plant cover crop does several jobs at once: it crowds out weeds, builds organic matter as it breaks down, fixes nitrogen if you use legumes, and shows you how the soil actually performs before your vines go in.
A legume-dominant mix (crimson clover, vetch, bell beans) or a legume-grass blend is the common pick. Cornell's viticulture program notes vetch-oat mixes are popular in the Northeast for building tilth fast before vine establishment [4]. In California, a mix of bell beans, peas, and oats is a standard UCCE recommendation.
Mow or terminate the cover crop 4 to 6 weeks before planting. Till it in or leave it on the surface as mulch. In a dry climate with spring planting, leaving the residue on top conserves moisture and keeps suppressing weeds.
Skip deep-rooted perennial mixes if you're planting vines within the year. Chicory, sudangrass, or sorghum-sudangrass hybrids build root systems that fight young vines for water. Annuals are the safer bet in a pre-plant scenario.
One benefit people miss: where your cover crop grows poorly tells you something real about the soil. A patchy, stunted spot might mean a high-pH pocket, a subsurface drainage problem, or shallow bedrock. Better to find it before the vines go in.
How do you handle nematodes and soil-borne pathogens before planting?
Nematodes are the main pre-plant pathogen worry in most wine regions. Root-knot nematodes (Meloidogyne incognita and M. arenaria) and dagger nematodes (Xiphinema index) both turn up across California, the Pacific Northwest, and parts of the South and Mid-Atlantic [3].
If your nematode assay comes back clean and the ground hasn't grown susceptible hosts lately, you may not need fumigation at all. Rootstock choice handles a lot of nematode pressure on its own: 1103P, 5C, and 039-16 rate resistant or tolerant to most Meloidogyne species. AXR#1, once planted all over California, has no resistance and is off the table now.
If you do need to fumigate, the methyl bromide phase-out has pushed most of the industry toward Telone II (1,3-dichloropropene) and chloropicrin combinations. These are restricted-use pesticides. Application takes a licensed pest control adviser and a certified applicator. Under the EPA Worker Protection Standard, workers can't enter fumigated fields during the restricted-entry interval, and posting requirements apply even with no workers on site [5].
The EPA Worker Protection Standard at 40 CFR Part 170 requires that "agricultural employers must provide specific information and protections to agricultural workers and pesticide handlers" [5]. Don't treat fumigation as routine paperwork. The liability from a WPS violation is real.
Alternatives on moderate-pressure sites: a one to two year fallow with repeated cultivation, or a biofumigant brassica cover crop (mustard, arugula) incorporated at bloom. Biofumigation doesn't match chemical fumigation, but it costs almost nothing and builds organic matter along the way. On light sandy soils with heavy nematode pressure, though, biofumigation alone usually falls short.
What does it actually cost to prepare soil for a vineyard?
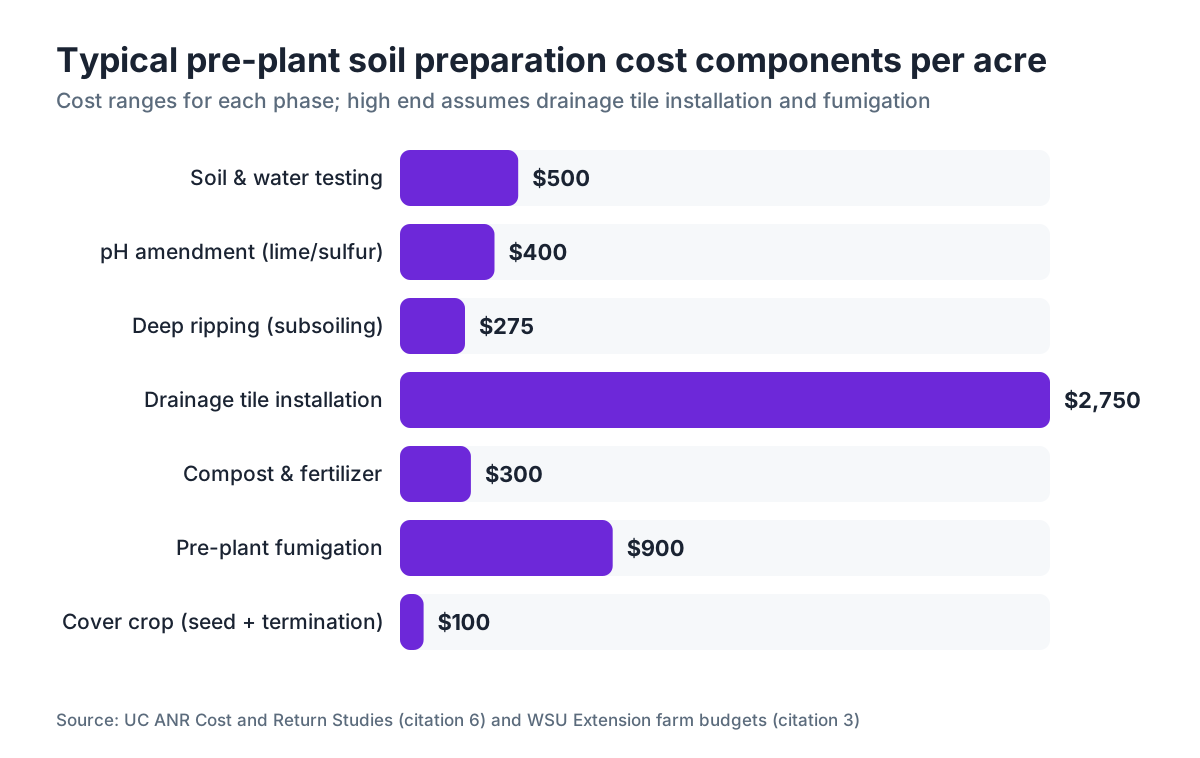
The honest range is wide: $2,000 to $15,000 per acre, and both ends are real. Here's where the money goes.
Soil and water testing: $200 to $800 per block for a thorough initial battery including nematode assay and percolation tests.
Lime and sulfur applications: $100 to $600 per acre for materials. Custom application adds $30 to $80 per acre.
Deep ripping (subsoiling): $150 to $400 per acre for a contractor pass, depending on depth and equipment. Rocky soils cost more.
Drainage tile: $1,500 to $4,000 per acre if needed. This is the single biggest wildcard in establishment cost.
Organics and fertilizers: compost at $25 to $50 per ton delivered, applied at 4 to 8 tons per acre, works out to $100 to $400 per acre in materials.
Fumigation (if needed): $600 to $1,200 per acre for a full treatment. This swings a lot by region and product.
Cover crop seed and termination: $50 to $150 per acre.
For a block that needs drainage work, pH correction, and fumigation, $8,000 to $12,000 per acre before a single vine goes in is entirely realistic. For a site with decent native drainage, reasonable pH, and clean nematode results, $2,500 to $4,000 per acre is a more typical budget. Neither number covers land clearing or road work.
These figures line up with cost ranges in University of California farm budgets for wine grape establishment in the North Coast and San Joaquin Valley [6]. Costs in Oregon and Washington run similar per the WSU Extension farm budget series [3].
How does rootstock choice connect to soil preparation decisions?
Rootstock selection and soil prep are two halves of one decision. The right rootstock makes up for soil conditions you can't change. The wrong one makes a prepared soil perform worse than the raw site would have with a better match.
For high-pH, calcareous soils: 41B, 140Ru, Fercal. These tolerate iron chlorosis and free lime. Don't plant SO4 or 3309 on a high-lime site and expect foliar chelates to close the gap.
For low-vigor, sandy, low-fertility soils: 110R, 140Ru, and 1103P push more vigor. 3309C and Riparia Gloire de Montpellier are lower-vigor picks for fertile soils where you're trying to hold growth down.
For nematode pressure: 1103P, 5BB, and 039-16 tolerate most Meloidogyne species. Confirm current resistance ratings with your nearest extension viticulture advisor, since the data gets updated as new nematode populations are characterized [3].
For wet soils: no commercially available Vitis rootstock genuinely tolerates chronically waterlogged ground. Fix the drainage. Don't try to plant around it.
Make this call before you lock in your soil prep plan. If you're planting a high-vigor rootstock on already fertile ground, ease off the organic matter additions. If you're planting a low-vigor rootstock on poor sandy soil, a more aggressive amendment program earns its keep.
How do organic vineyard certifications change what you can apply pre-plant?
If you're headed for USDA National Organic Program certification, the pre-plant period is actually one of the more forgiving phases. NOP requires a 36-month transition between the last application of a prohibited substance and the first harvest sold as organic [7]. That clock starts from your last prohibited application, not from planting.
What that means in practice: fumigate with Telone II in year one, plant in year two, and your vines hit their third or fourth leaf before you can sell organic fruit. Some growers make peace with that math. Others skip fumigation, accept more risk, and transition faster.
Amendments allowed under organic: lime, gypsum, rock phosphate, elemental sulfur, composted manure, fish meal, kelp, and other naturally derived materials. Synthetic soluble fertilizers (ammonium nitrate, some potassium chloride formulations) are prohibited once you're operating under an organic system plan.
Copper-based fungicides applied pre-plant for soil pathogen management are allowed under organic but capped under NOP's updated copper limits. Check the current annual copper application rate with your certifier before you apply, because the allowance is tracked per acre per year [7].
Get your certifier in the loop before you start pre-plant work. The conversation goes easier when you're reviewing planned applications than when you're explaining past ones.
What do UC Davis, Cornell, and WSU recommend differently for site-specific soil prep?
The three big US university viticulture programs share a lot of common ground, but their regional focus shapes what they stress.
UC Davis and UC Cooperative Extension (California) lean hard on drainage assessment, given the Mediterranean climate where wet winters and dry summers create a specific problem set. UCCE also pours resources into nematode management and rootstock guidance for the wildly varied soils across Napa, Sonoma, Lodi, and the Central Valley. Their UC ANR viticulture and cost-study publications are the standard reference for California establishment [1].
Cornell Cooperative Extension (New York and Northeast) focuses much of its guidance on cold-sensitive rootstocks and glacially deposited, often rocky soils. Cornell stresses fall cover crop establishment because the growing season is short, and its viticulture team has published a lot on cover crop mixes suited to cool, wet Northeast springs [4]. Drainage in shallow glacial soils comes up again and again.
WSU Extension (Washington, Oregon) puts real weight on wind erosion control during site prep, since many Washington sites sit in dry, wind-exposed country. It also covers fumigation decisions for the Yakima Valley and Columbia Basin and rootstock choices for soils ranging from sandy loam river bottoms to rocky basalt-influenced upland ground [3]. WSU's farm budget publications are among the most detailed publicly available for vineyard establishment cost estimation.
All three agree on the core sequence: test first, amend on test data, rip if needed, manage drainage, grow cover crops. Where they split is the specific products, timing, and priorities that fit their climates and soil parent materials.
Frequently asked questions
How long does it take to prepare soil for planting a vineyard?
Realistically, 1 to 3 years. The minimum is 12 months if you test right away and move quickly. Two years gives lime time to work into the subsoil, room for two cover crop cycles, and a full wet season to watch drainage before vines go in. Three years is ideal on tough sites needing heavy pH correction or drainage work.
What is the ideal soil pH range for grapevines?
Most grapevines perform best at pH 6.0 to 6.5, though they handle 5.5 to 7.0 reasonably well depending on rootstock. Below 5.5, manganese and aluminum toxicity become concerns. Above 7.5, iron and zinc go unavailable and lime-induced chlorosis appears. On calcareous soils above pH 7.5, rootstock selection matters as much as pH correction.
Do you need to fumigate soil before planting grapes?
Only if a nematode assay confirms problem populations, or if the ground has a history of susceptible crops and you're planting a susceptible rootstock. Fumigation with Telone II or chloropicrin costs $600 to $1,200 per acre and requires a licensed applicator under EPA Worker Protection Standard rules. On clean ground, a resistant rootstock is usually enough.
How deep should you rip soil before planting a vineyard?
Target 24 to 36 inches to break up any hardpan, compaction layer, or claypan that restricts roots and drainage. Use a tracked dozer with a deep ripper shank when you can. Rip when the soil is dry enough to fracture and shatter rather than smear. Cross-rip perpendicular to your rows if budget allows, to shatter hardpan across the full block.
What soil tests do you need before establishing a vineyard?
At minimum: standard chemistry panel (pH, OM, CEC, N, P, K, Ca, Mg), micronutrients (Zn, B, Mn, Fe), nematode assay, and a physical percolation test. Sample two depths separately: 0 to 12 inches and 12 to 24 inches. Use a lab familiar with grapevine ranges; generic agronomic interpretations are calibrated for row crops and push levels higher than vines need.
How much does vineyard soil preparation cost per acre?
The honest range is $2,000 to $15,000 per acre. Simple sites with good native drainage and reasonable pH run $2,500 to $4,000 per acre. Sites needing drain tile ($1,500 to $4,000/acre), fumigation ($600 to $1,200/acre), and heavy pH amendment can reach $8,000 to $12,000 per acre before a vine goes in. UC farm budget publications for your region give the most reliable current estimates.
What cover crop should you plant before establishing a vineyard?
A legume-dominant mix works well most places: crimson clover, vetch, or bell beans with a cereal grain like oats or barley. The legumes fix nitrogen and build organic matter; the cereal adds bulk and crowds out weeds. Terminate 4 to 6 weeks before planting. Skip deep-rooted perennials like chicory or sorghum-sudan that fight young vines for water.
How do you improve drainage in a vineyard site?
Perforated drain tile on 20 to 40 foot centers is the most reliable fix for chronically wet ground, running $1,500 to $4,000 per acre installed. On moderate sites, deep ripping to break impermeable layers plus surface shaping to a 1 to 2 percent grade toward swales often handles it. Raised bed rows lift roots 6 to 12 inches above the water table at lower cost than tile.
What rootstock should I choose for high-pH calcareous soil?
41B, 140Ru, and Fercal are the standards for soils with high pH and free calcium carbonate. They tolerate iron chlorosis that hits susceptible rootstocks like SO4 and 3309 on high-lime sites. Confirm current recommendations with your university extension viticulture advisor, since rootstock performance data gets updated as new plantings are evaluated.
Can you prepare vineyard soil for organic certification?
Yes. The USDA NOP requires a 36-month transition from the last prohibited application, not from planting. Allowed pre-plant amendments include lime, gypsum, rock phosphate, elemental sulfur, compost, fish meal, and kelp. Synthetic soluble fertilizers and most fumigants are prohibited under an organic system plan. Get your certifier involved before pre-plant work begins, not after.
How do you manage soil erosion during vineyard site preparation?
After ripping, the ground is bare and highly erodible until a cover crop establishes. Seed right after tillage, especially on slopes. Install straw wattles or silt fences at the downslope edges of the block if rain is coming before germination. Keep the gap between ripping and seeding short; two weeks bare on a 10 percent slope can move real topsoil in one heavy rain.
How much compost should you add before planting a vineyard?
4 to 8 tons per acre is a typical pre-plant rate. It adds measurable organic matter and improves soil biology, but the effect on organic matter percentage is modest short-term, since a typical loam already holds 30 to 100-plus tons of organic matter per acre. The bigger wins are better water holding in sandy soils and improved clay flocculation and microbial activity across most soil types.
What records should you keep during vineyard soil preparation?
Keep copies of all soil test and nematode assay reports, dated records of every amendment (product, rate, acres, date), fumigation records with applicator license numbers, and drainage maps showing tile placement. If you pursue organic certification or any sustainability program, these records form the baseline of your compliance file, and you can't reconstruct them from memory years later.
Sources
- University of California Cooperative Extension, ANR Publication on Grapevine Nutrition and Soil Preparation: UC Cooperative Extension recommends soil sampling at least one year before planting for amendments to react, and identifies poor internal drainage as the most common soil-related cause of vine failure in the first decade.
- UC Davis Department of Viticulture and Enology, Soil and Plant Tissue Testing: Standard university extension soil chemistry panels cost $20-$50 per sample; commercial labs run $30-$80 for comparable tests.
- Washington State University Extension, Vineyard Establishment and Nematode Management: WSU Extension specifically recommends nematode testing before any new vineyard planting in the Pacific Northwest; WSU farm budget series documents establishment cost ranges.
- Cornell Cooperative Extension, New York Viticulture and Cover Crop Recommendations: Cornell's viticulture program notes that vetch-oat cover crop mixes are particularly popular in the Northeast for building tilth quickly before vine establishment.
- U.S. EPA, Worker Protection Standard, 40 CFR Part 170: The EPA Worker Protection Standard requires that 'agricultural employers must provide specific information and protections to agricultural workers and pesticide handlers' including early-entry protections and posting requirements for fumigation.
- University of California ANR, Wine Grape Cost and Return Studies: UC farm budget publications for North Coast and San Joaquin Valley report vineyard establishment cost ranges used to validate soil preparation cost estimates in this article.
- USDA Agricultural Marketing Service, National Organic Program Regulations: NOP requires a 36-month transition from last prohibited substance application; updated NOP regulations cap copper applications under an annual per-acre limit.
- UC Davis, Viticulture and Enology, Rootstock Selection Guide: 41B, 140Ru, and Fercal rootstocks are recommended for high-pH calcareous soils; 1103P, 5C, and 039-16 have resistance or tolerance to most Meloidogyne (root-knot nematode) species.
- USDA NRCS Web Soil Survey: NRCS Web Soil Survey provides baseline soil texture, drainage class, and CEC data useful in vineyard site assessment before physical soil sampling.
Last updated 2026-07-09